

How to make the Last Months of the Year incredibly Productive
It’s hard to believe that this year is actually in its final few months! It seems that 2018 has literally flew by and I can’t believe that 2019 is just around the corner. With the holidays upon us, days seem to go by faster than ever, making you feel like you have a lot less time on your hands than you’d hoped.
A lot of people have already started thinking about their new year’s resolutions! January 1st has a fascinating effect on most people, acting as an opportunity to change everything. But 2018 is not over yet. So, instead of worrying about what changes we can make next year, let’s focus on what we can still achieve in the next few weeks.
With 77 days left in the year, you still have time to achieve more. Go through the goals you had set for yourself in the beginning of the year and check what you’ve already achieved. Then, see what’s left and decide on the most important goals. Choose the ones that you really want to accomplish before the end of the year, and focus on those. You still have time!
However, in order to be super productive and achieve as much as possible in the time you have left, it’s important to be focused and to have a plan. Today, I’d like to show you 5 ways that can help you boost your productivity and finish 2018 with a bang!
1 | Workflow Chart
I am a creature of habit. I love setting up routines and to have some sort of system for my various tasks. I find that when I have an order of operation, I finish tasks faster and in a more efficient way. I like to know what I’m doing and when, and I prefer to follow a step-by-step process whenever possible. When I have projects that require me to do a set number of tasks in a specific order, I like to use a workflow chart.

This is a chart where I create a list of each step of my process horizontally and then I can make another list, with all the different projects where this process can be applied to, vertically. Then I just cross off each step as I’m doing it. That way, I can take on multiple projects and keep up with everything that needs to be done. I apply this to my freelance work, but also to my blog and my YouTube videos.
The Workflow chart definitely helps me to boost my productivity! It helps me to keep up with all the tasks at hand and to make sure I don’t miss anything.
2 | Weekly Improvement Plan
I’ve been reading ‘The Magic of Thinking Big’ by David J. Schwartz and I’ve been impressed by how much this book has inspired me! One of the things that I’ve implemented after reading this book is the ‘Weekly Improvement Plan’. This is a plan that helps me to do things better as each week rolls around.
Usually I would do a monthly review at the end of each month, to see what has worked and how I can improve my performance in the next 30 days. However, after reading this book I realised that doing a review once a month is not enough to see the details. And it takes too long until the time comes to make changes. So instead, I decided to do a review at the end of each week. That way, I can make changes fast and be more aware of what needs to be done.
I ask myself these questions:
How can I do more?
How can I do things better?
What can I do to increase my productivity?
How can I work more efficiently?
I also have a notebook where I write any ideas I have during the week. At the end of the week, I review all these ideas and then I choose the ones that can be helpful with what I’m working on that the moment. Then I make a plan to implement those ideas in the next week.
And I tell you what… it works! I’m more aware of new ideas when they come me and I make sure to note them down, in case I forget. Also, I’m constantly checking what works and what doesn’t, to see what I can improve for next week.
Give the Weekly Improvement Plan a try and you’ll see for yourself how it can help you to achieve more in a short space of time.
3 | Journaling
After stopping for some time, I decided to start my morning routine again. However, instead of adding all these various things that I’m “supposed” to be doing first thing in the morning, I decided to adjust it to my personal needs and the time I have available.
My morning consists of me waking up at 6am every day, getting the kids ready and taking them to school. When I come back I do some of my housework and then I work from home until the kids come back. I remember before, I was pushing myself to squeeze in a morning routine that included 5-6 different things that I “had" to do. However, I realised very soon that it was not helping me. On the contrary, it was making me very stressed and upset. The reason for that was, that the time I have in the morning when the kids are going to school is my most productive time of the day. That’s the time that I have the peace and quiet I need in order to work on my projects and deadlines. Instead, I was spending it on doing my 2-hour long morning routine and by the time I was done with it, I didn’t have enough time to finish my work.
I decided to be honest with myself. I realised that I don’t have the time in the morning to exercise, read, meditate, journal, visualise, do affirmations and lots of other things that I included in my morning routine. I can still do all these things during the day if I want to, but not in the morning. So, after some thought I decided to add only one thing for 30 minutes in my morning routine and that is journaling. And that has made all the difference!
So, for half an hour every single morning I take my notebook and write down all my thoughts. I journal about whatever is in my head at the time, and that puts my thoughts in order and helps me start my day right. It is unbelievable how positively this has affected my thought process and my productivity.
If you choose one thing to do in the morning, I would highly suggest that you do some journaling. Spend some time with yourself and your thoughts and see how this will help you with your day and your productivity.
4 | Screen Time
When Screen Time was added on the iPhone, I was amazed to see how much time I was spending on Social Media every day. You might think that you go on Instagram for 5 minutes here and there, but when at the end of the day you add everything up, you’ll be surprised with the amount of time you spend on there!
So, after seeing how much time of my day I was procrastinating online, I decided to do something about it. I set up a downtime period and I added limits to specific apps during the morning, when I’m working. That way, I block all the apps that prevent me from using my time efficiently. And let me tell you, I’m amazed with the results and how many more things I manage to do in the same time that I have available each day!
Get more productive by switching off notifications, avoid picking up your phone every 5 minutes and focus on getting things done.
5 | Wake Up Early
When I wake up early, I feel that I have more control over my day. I have more time for planning, strategic thinking and getting organised. I feel more energised and more focused.
Did you know that if you were to get up just one hour earlier each morning you would gain 15 days in a year? When you put things into perspective, it’s amazing to see how many days you can ‘gain’ if you just set up your alarm a bit earlier than usual!
So if you haven’t already created the habit of early rising, start tomorrow. Build the discipline and set your alarm to wake you up very early. You’ll soon realise that you are more creative and more effective in the early morning hours. It may take a couple of days to adjust, but stick with it. You’ll be amazed with the results!
Start implementing these effective productivity-oriented strategies today and see your life transform.
What are some practices that help you stay productive? How do you make the most out of your time? Let me know in the comments below.


How to make your own stickers for your bullet journal
Today I'll share with you the way I make my own stickers to use in my bullet journal. It's for those days that you just don't have enough time to doodle anything at all, but you still want to have fun and be creative with your journal. Of course you can use the same technique to make any type of stickers you want.
What you'll need:
- White Paper - I used Sketch Paper because I wanted to use watercolours with my stickers.
- Black Pen to draw the shapes you want.
- Watercolours and a paint brush - You can also use coloured markers if you want.
- Avery Clear Sticker Project Paper
- Scanner and Printer
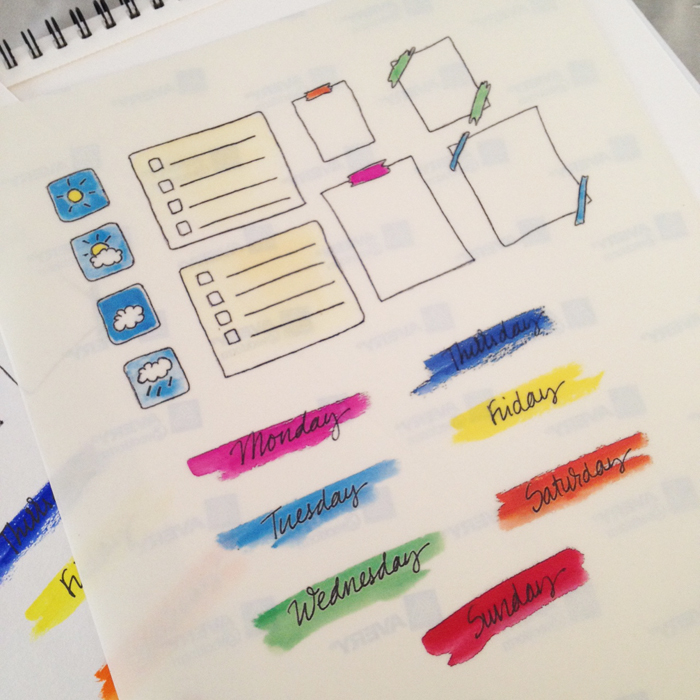
The first thing you need to do is to take a piece of white paper and make all the doodles that you think you'll need. I made some weather icons, because they can be time consuming sometimes, the days of the week with some colourful background and some fun little tick boxes, as well as some plain paper pages that you can utilise in many ways.

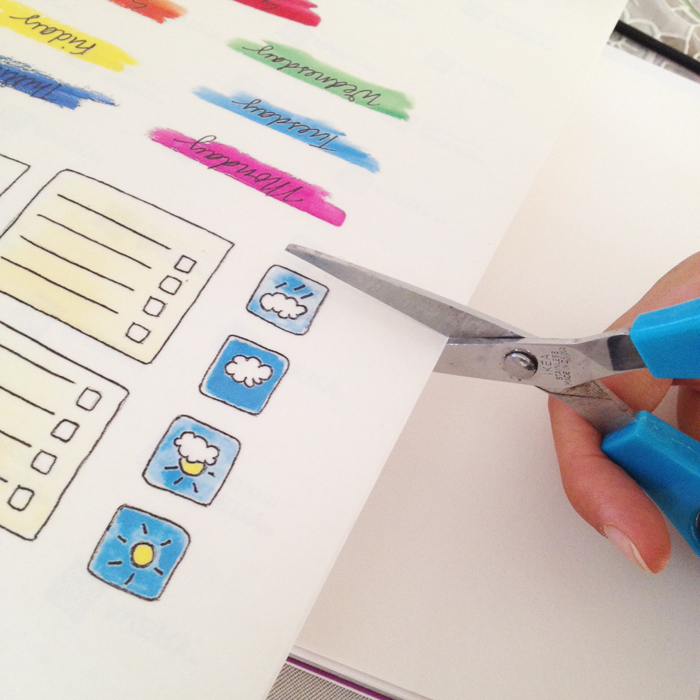
Once you are happy with all the doodles you've created, you'll need to scan the page and then print it on a self adhesive sheet. I used the Avery Clear Sticker Project Paper (8.5"x11"), but you can also use white sticker paper. It's really up to you. I just like to have the same colour as my notebook's pages.
Then, every time you need to use one, you can cut it with the scissors and you're done!
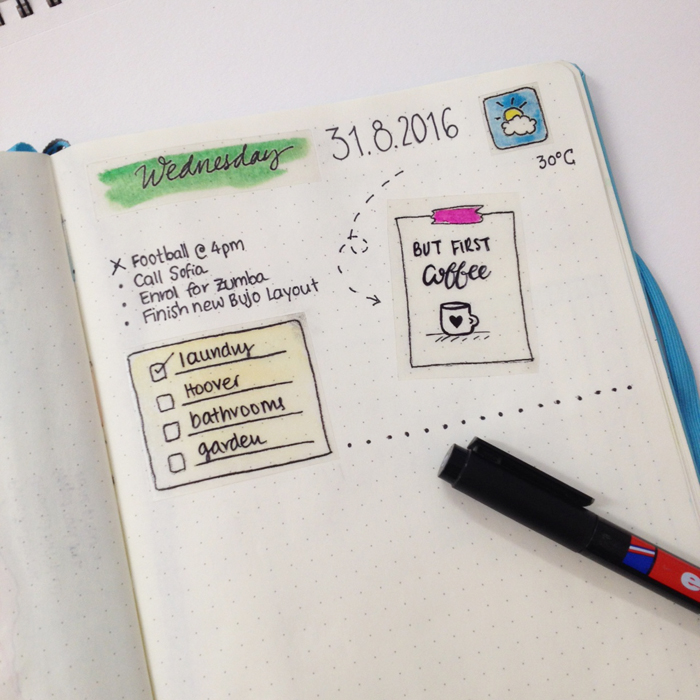
Making your daily spreads is going to be so much quicker and easier now for those days thay you just can't spare any time on being creative with your bullet journal.
** You'll need a permanent marker to write on the stickers :) **
Join now my newsletter and get the FREE Stickers Printable. Plus get access to the Library of Free Resources.


How to make your own font

If you know me then you know that I LOVE Fonts! I constantly look for new fonts to add to my collection and to use, and I am always checking Creative Market for new font bundles and typefaces. If you'd like to see my favourite fonts, then you can check them out in the relevant post I've written here.
But how cool would it be if you could make your OWN font? And what if I told you that it takes only 3 to 4 easy steps to create your masterpiece?
Oh, yes it's true! As I was searching the other day, I came across this website called MyScriptFont.com where you can create a font from your handwriting. The process is quite straight forward.
Once you visit the website, then you have to download a template. You can choose between a PDF or PNG format. Then you have to print it, so that you can start writing your letters on it.

You fill in the capital letters, lower case, numbers and punctuation. There are also optional letters to fill in for languages like german, french etc. that have different punctuation on certain letters.

Make sure that your letters touch the bottom inside line like my 'e' and they don't go over it like my 'o', if you want your letters to be on a straight line when you type.

If you don't mind or you want an uneven type of font then you don't have to pay attention to that line. However, your letters should not go out of the little box or touch the sides. Make sure you're using a medium-thick black pen so that you get the desired result. I tried it with a thinner tip pen, and the letters didn't come out as vivid as I wanted. Of course you can try different things and different ways until you get what you want in the end.

Once you are satisfied with the result, then you have to scan the template and upload the file on the website. At this stage you also get to name your font (cool!) and choose a TTF or OTF format. (Of course I named my first font 'Christina' .... how creative!!!) Once you've done all this, then you click start and wait for a few seconds. And Voilà! Your font is ready to be installed in your computer!
Go to Control Panel > Appearance and Personalization > Fonts
Copy / Paste your font there and you're good to go :)
So, say hello to my very first font!

I know it's not perfect but I think it's ok for a first try. I'm sure I'm going to be creating more fonts from now on!!!! :)
Then I had a brilliant idea! What if instead of letters I put in each square a doodle?

So, I just made some doodles in a new template form and followed the above steps like before. To my surprise it worked and I present to you christina77star's doodle font ;)
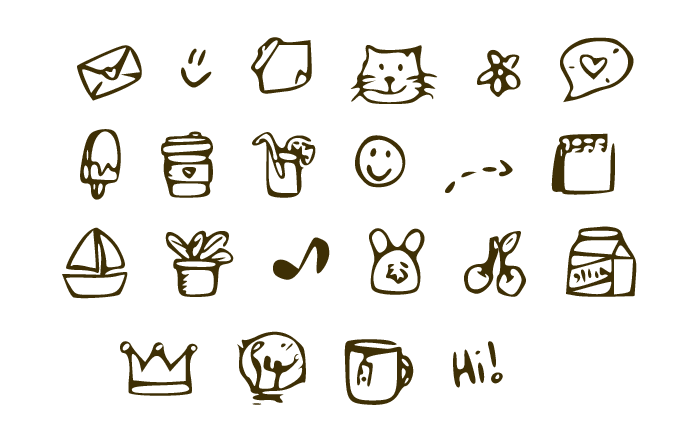
You can see that not all of the doodles came out as perfect as I'd like to. When making doodles you can certainly play with the thickness of the lines so that they come out clear, and stay away from little details cause they will not come out as good. But all in all I'm really excited with the result! If you'd like to download my doodle font please click here.
Hope I inspired you today with something new. If you create any new fonts I'd love to see them.

