

New Bullet Journal Flip Through (+ Video)
Today I'll share with you the pages and spreads that I've created in my second bullet journal until now. This time I've chosen a bright orange Leuchtturm1917 in A5 with dotted grid. (You can see my first bullet journal here). I started my second bullet journal in the beginning of September and I've managed to transfer most of my favourite spreads in it by now.

Today I'll share with you the pages and spreads that I've created in my second bullet journal until now. This time I've chosen a bright orange Leuchtturm1917 in A5 with dotted grid. (You can see my first bullet journal here). I started my second bullet journal in the beginning of September and I've managed to transfer most of my favourite spreads in it by now.

Watch the Video here!
Moving to a new bullet journal can be a bit of a pain with all the spreads you have to recreate. However, I quite liked it, because this time I got to choose which spreads to add, put them in the beginning of the journal, so that I can have easier access to them (having all the important spreads in the beginning, rather than having them spread in different places in the journal), and put them in the order that I liked.

I also got to make any changes that I thought were necessary and change the layout or the way I decorated the pages. All in all I'm really happy with the result and I love all the pages that I've recreated.
So, let's get started!

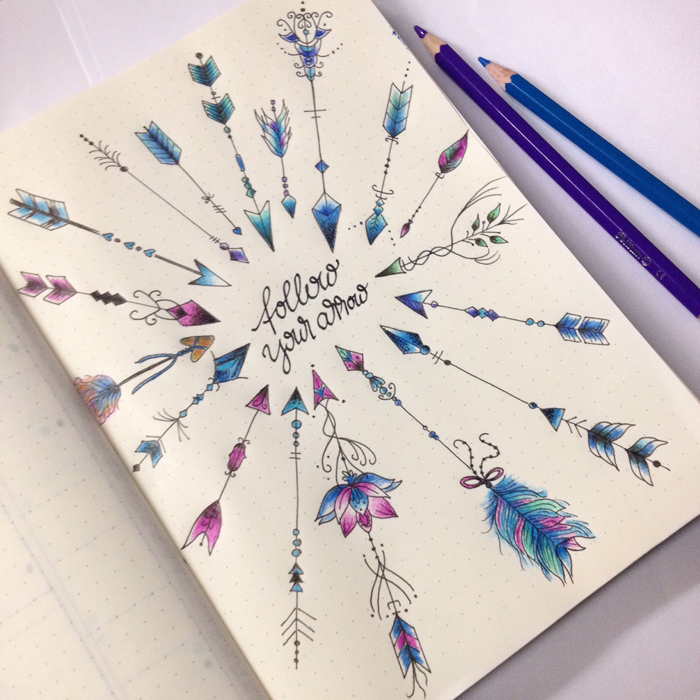
The first page after the index pages was a page that I wanted to decorate with a nice phrase or a quote. There is a phrase that I picked up from Pam Grout's book "E-Cubed: Nine More Energy Experiments That Prove Manifesting Magic and Miracles Is Your Full-Time Gig" that I say every morning, and that is 'Something amazing is going to happen today' I really wanted to include this in my bullet journal, so I created this page and I love it because it's the first thing I see when I open my bullet journal.

In the next page I wanted to include my Word of the Year and my Mission Statement, but I wanted to do something a bit different than before. I got inspired by Nicole and her lovely air-balloon drawings and created the above page, which is definitely one of my favourites.

I always include a page of Useful Numbers for me but also for my kids. They know that in a case of emergency they can go to this page and call the number they need.

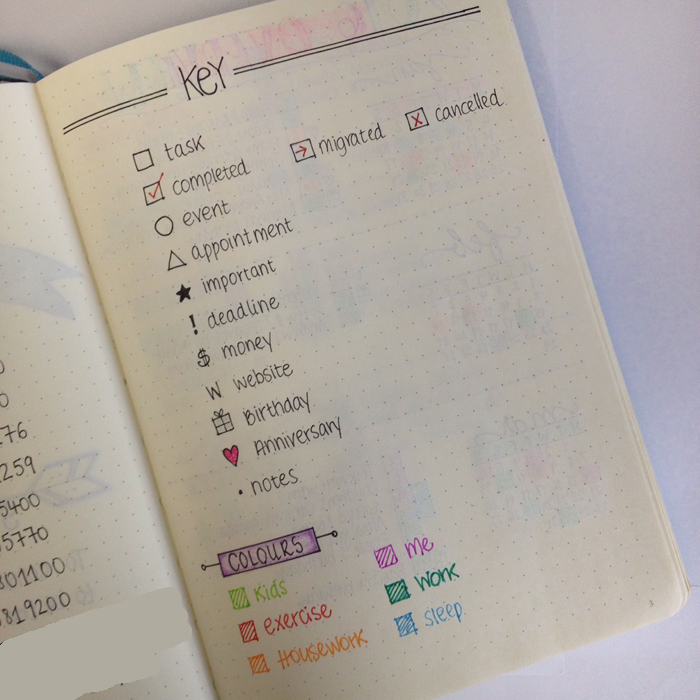
I simplified my Key completely. Now I only use a dot for everything. I only use more specific symbols for bithdays and anniversaries. I found that using various different symbols for your activities can be a bit confusing some times, and I also thought that it made my pages a bit messy. The Colour Code has all the colours that I use for my dailies and for my time management bar, and it has stayed the same.

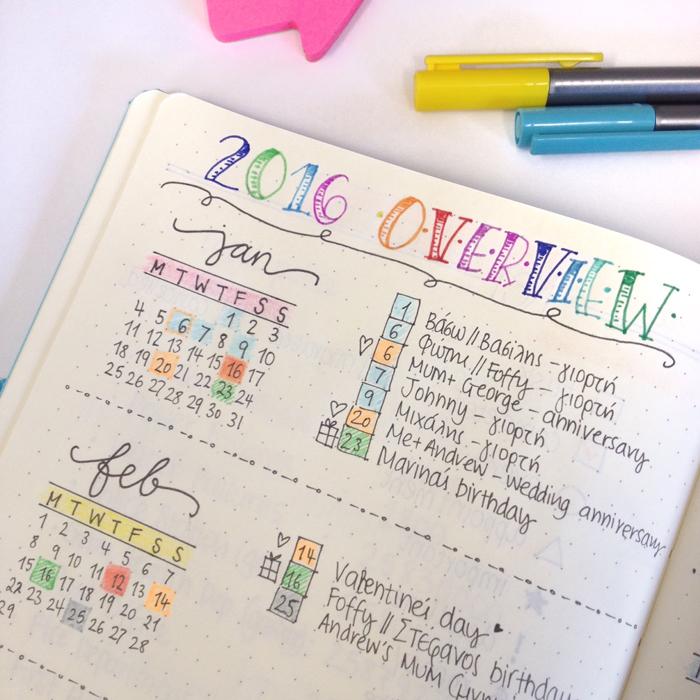
I wanted a Year at a Glance spread. In my previous journal I created this spread in 4 pages, but this time I wanted to condense everything in only 2 pages. I really like how it turned out. This is the page I use to note down holidays, birthdays, anniversaries, various events and school related days. Now I can see how my schedule is looking for the next 12 months.
* There is a printable version of the above 2-page Year at a Glance spread for 2018. You can find it here.

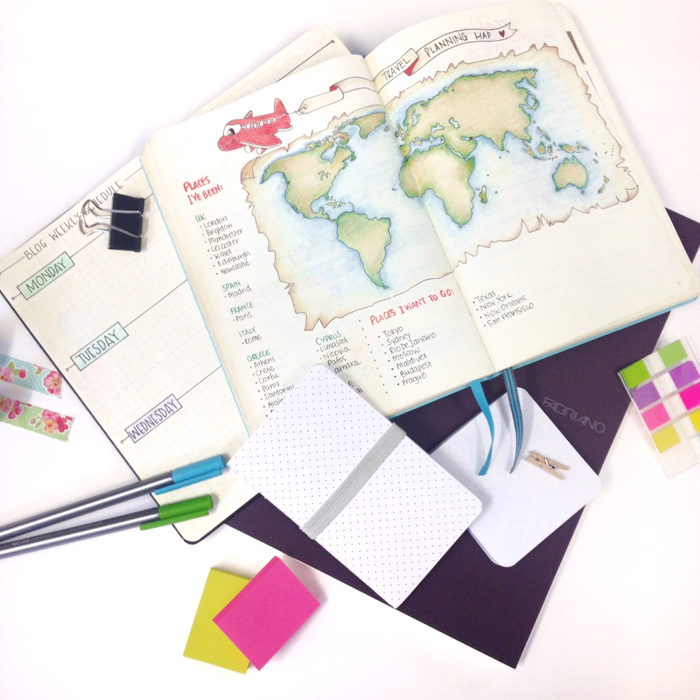
In the next spread I created my Future Log where I note down all the appointments, events and other important dates. I have a full blog post dedicated to this one if you want more information about it. So, having these two spreads together is really functional, because I can see straight away what I have to do in each month.

Then I created my Level 10 Life / Level 10 Goals spread, which I've changed up a bit. I talked about it thoroughly in this post if you want to check it out. But it's basically an assessment of your life as it is now in 10 different areas. Then you set up your goals in each one of those areas and you establish the ways and habits that will help you get there. I loved it when I read about it in Hal Elrod's book 'The Miracle Morning' and it has helped me a lot in my goal setting.


The next two spreads are about the books I want to read and the books that I have read during 2016. On the first page I'll write previous publications that I really want to read - my top picks from my wishlist. Then I have new publications per month and lastly I note down all the books I've read in 2016. By the way, a little update about my reading goal that I mentioned in the '17 before 2017' post. I had to changed it because it was completely unreasonable.... There was no way could have read 20 books by the end of the year, especially with my schedule as it is now. So now, my reading goal is 60 books in 2016 which is definitely more achievable..

Moving further, the next spread is about my Planning Routine. This is the only spread that I didn't change a thing. I literally copied it from my first journal.

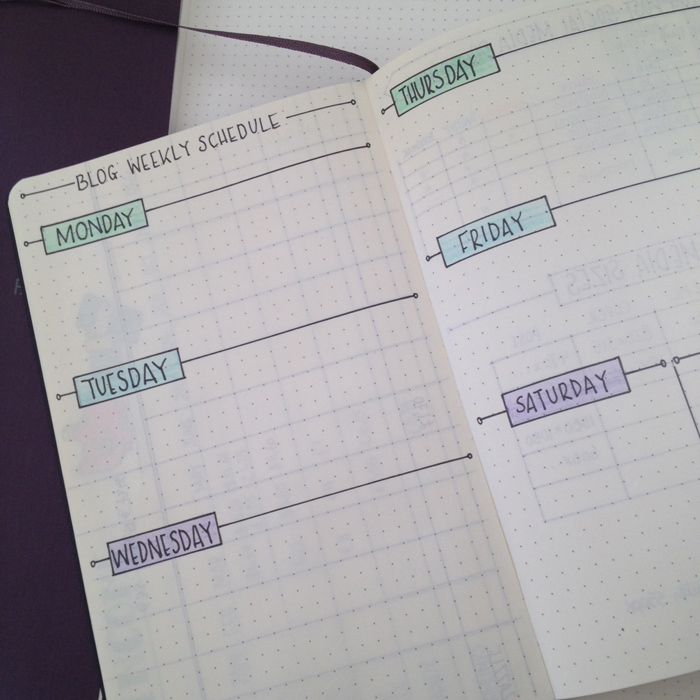
The next page is my Housework Schedule. This is the basic weekly schedule that I tend to follow. Of course, I can change things around depending on the things I need to do each week.

My Menu Planning is almost the same. I changed the banner at the top a bit, but generally I followed the same layout as my previous one. I need to add more food ideas for each category. It's a very helpful page if you're stuck each week and you don't know what to cook!
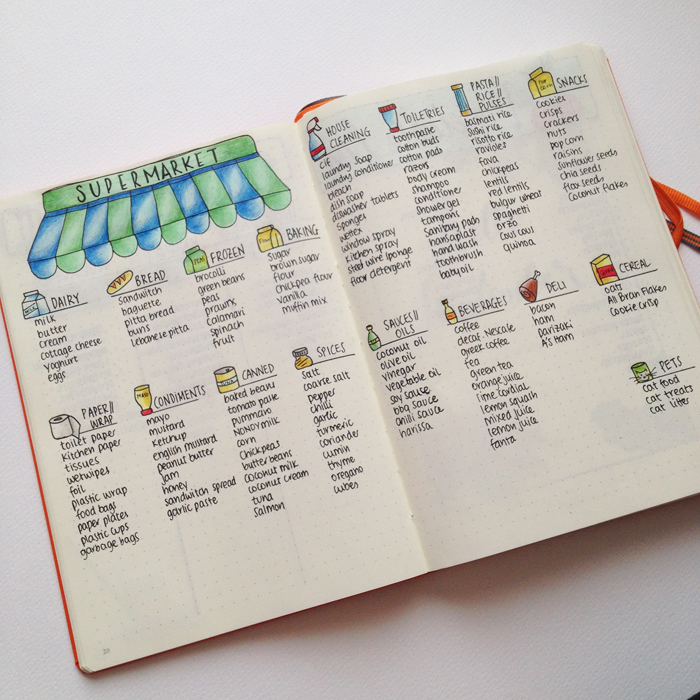
My Supermarket List looks neater and cleaner. Again I changed the banner at the top and rearranged the items a bit, but all in all it's the same spread. Very functional and practical.

Lastly, I also recreated a spread for my Vegetable List. Basically the same - just changed the top part a bit. The rest of the pages I've already shared them with you. You can look back in my September and October set ups to see how I prepared my bullet journal for each month.
So, there you have it. My new bullet journal set up. Which spreads do you recreate when you change journals?


JOIN THE GANG!
Get all the inspiration delivered to your inbox twice per month.
Plus get access to the Resources Library!
Future Log for your Bullet Journal
For the past few months I've been using a new method for my future planning that - dare I say it - I prefer it from the Calendex method (shocking I know!!!). I saw it in Veronika's Instagram account and I knew straight away that I've finally found the perfect Future Log for me!!
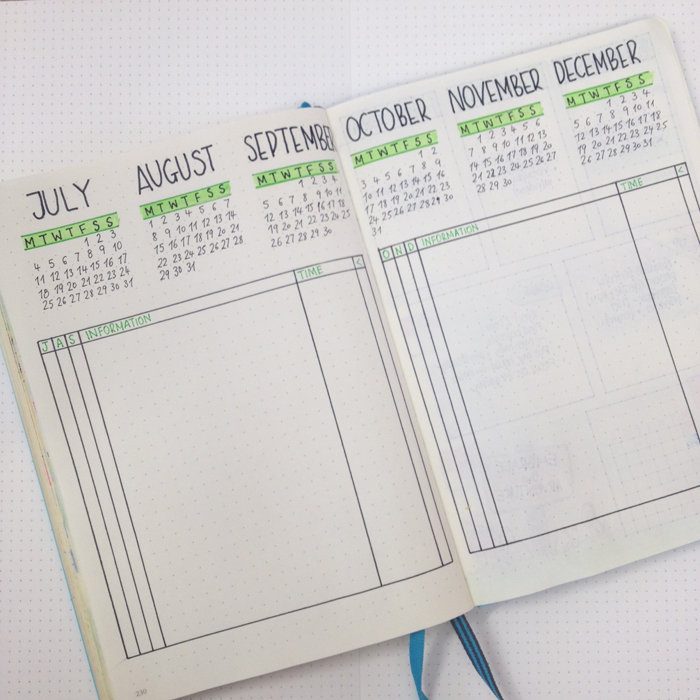
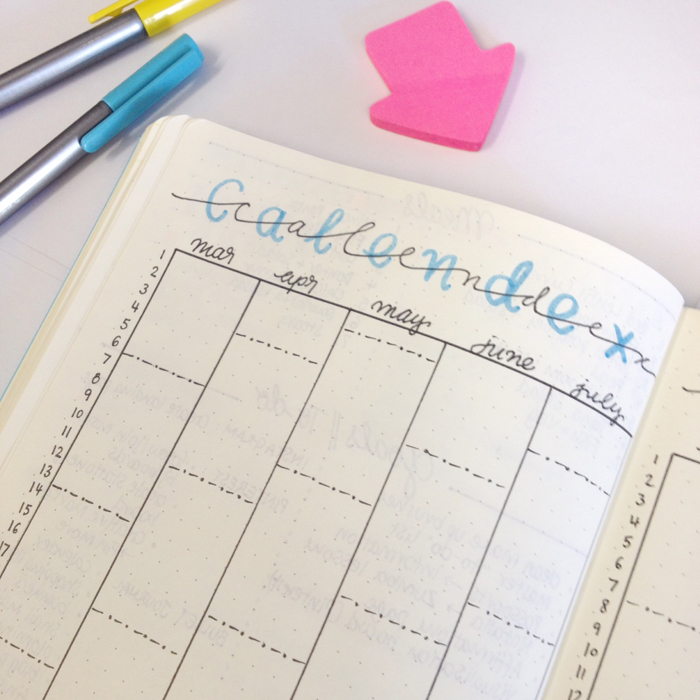
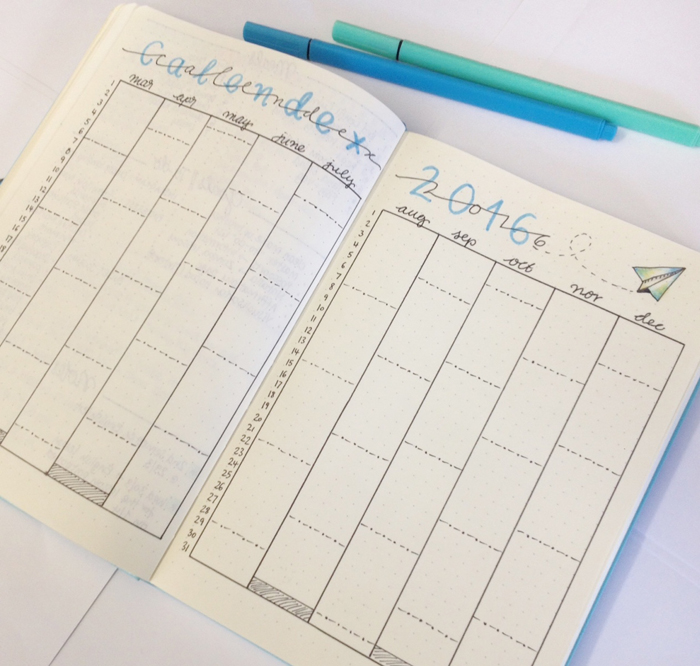
It's a combination of Ryder Carroll's Future Log and Alastair's Method. Basically, you write down the monthly tables for the next 6 months on the top of the page. I started from July, since that's when I started using this technique, but of course you can start any time you want. Underneath the month tables, on each page you then create one long table. The first 3 columns are one for each month and are titled with the first letter of the month. That's where you write the date that refers to that spefic month for each event you want to note down. Then you create a column for the event/appointment with all the information, and another one for the exact time of the event. Lastly, you create a small column in the end, where you can tick off any events/appointments that have already taken place. Of course you can add any other columns that might help you with your future planning.
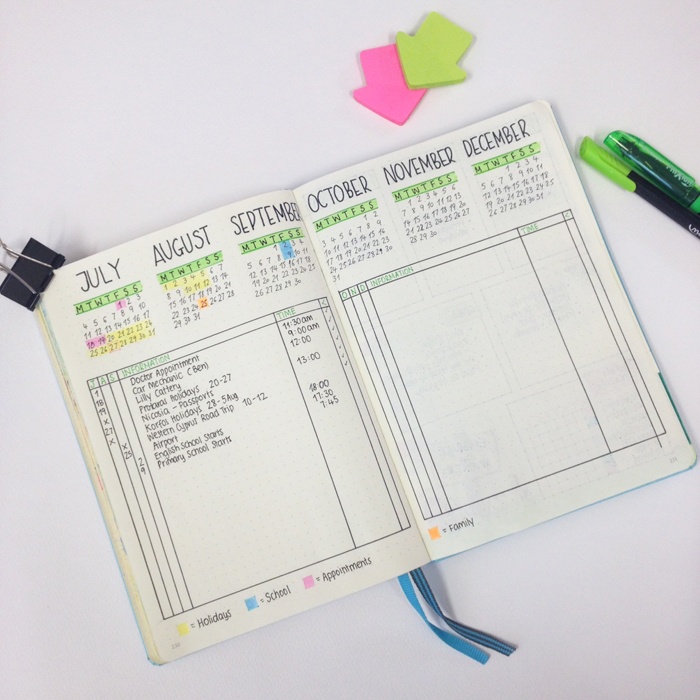
Once you've done that, you can then go ahead and add all your appointments/events to this table. Everytime you have a new event planed for the future, you can go straight to this page and add it with all the information needed. You can also create a colour code for each type of events, like I did, and mark them on the monthly tables on the top of the page. That way you can see straight away what you've got planned for the month. Genius!
What I really like about this method, is that everything is in one page. You don't have to go back and forth to different pages to see what's planned. And also you have 6 months at a time to plan ahead. Perfect!
Make sure you check out Veronika's Etsy Store where you can download this Future Log method. Also don't forget to check her website as well.
I'm so glad that I've found this future planning method, because it has really helped with the way I plan ahead. If you want more information on all the other methods you can use for your bullet journal, then you can check my post on future planning. Which method is your favourite?


Dot Grid Everything!
I used to be a straight lines girl. Sometimes I would fuss about the line spacing, or the colour of the lines, but that would be it. Since March though, I discovered the magical world of dot grid and my whole life has changed!
Ok, that may be a bit dramatic! But seriously, for the last three months everything I buy has to have dots! From my various notebooks, to my post-its and my note taking papers - dot grid is everywhere.
It all started when I bought my first Leuchtturm1917 bullet journal in dot grid and saw the difference.
So, why do I prefer the dot grid from the squared, lined or plain ones?
1. It helps me keep my writing and my lines straight.
2. Easier to make shapes even without a ruler.
3. You can draw without the lines/squares obscuring the drawing.
4. You can create even to-do list tick boxes.
5. They are good for diagrams - makes scaling a bit easier.
6. You can even write vertically.
Here is a list of all the things I'm currently using on a daily basis that are full of dots:

- My Leuchtturm1917 A5 Dot Grid Light Blue personal bullet journal that I use all the time! I've made a detailed review about it if you're interested here.
- My Moleskin Dot Grid Black blog bullet journal that I've just started using and I love it! I have made a post comparing the Leuchtturm1917 vs the Moleskine (though at the time I had a squared Moleskine). Even though I still believe that the Leuchtturm1917 has more advantages compared to the Moleskine one, however I tend to prefer the paper in the Moleskine notebooks. I know that it's thinner and it's not perfect for drawing or for darker and more wet pens, nevertheless, the pen seems to glide on the paper and I like my handwritting better on this one. For the purposes of my blog bullet journal, where I'm not drawing that much, it's perfect!

- My A4 Dot Grid Notepad by Fabriano. I just discovered this italian brand and I love it! It's made of ecological paper in a pale ivory shade and the quality is amazing. They also have various types of notebooks in dotted grid that I'd like to try out.

- My FULLFÖLJA notebook from IKEA. Small and compact, I carry it always in my handbag to write my notes on the go.

- My FULLFÖLJA notepad from IKEA. It has 500 dotted sheets and I love writing all sorts of notes on them! I've also created an A4 dot grid page with a paper plane design on the top. If you're a bullet journal addict like me and you prefer taking notes on a dotted grid paper, then this one is for you ;)
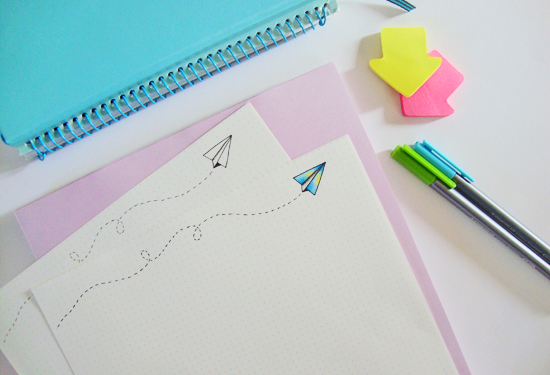
Join now my newsletter and get two FREE Printable designs - one with only the outline of the paper plane and one coloured by yours truly :)
JOIN THE GANG!
Subscribe now to my Newsletter to download the FREE Printable.
Plus get access to the Resources Library!
What type of grid do you prefer? Have you discovered the dot grid perfection yet?


Instagram Giveaway: The Winner!
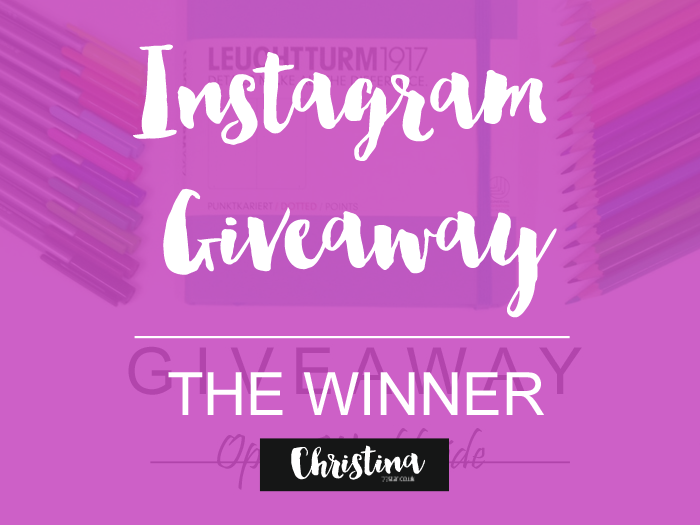
And yes, the day has come for me to announce the winner of my Instagram Giveaway!
I'd like to thank all of you who entered the giveaway and for your lovely comments. They always make my day :)
You've won some of my favourite things that I like to use for my bullet journal at the moment:
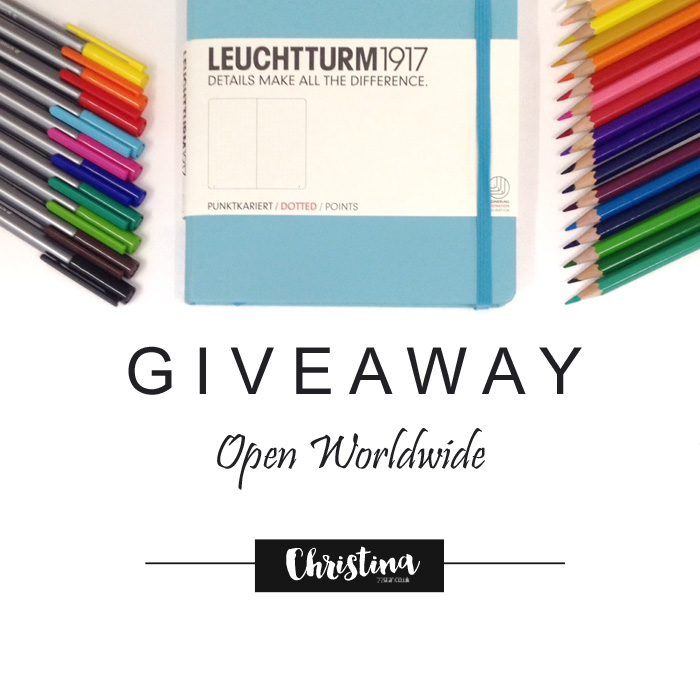
Instagram Giveaway - 5000 Followers!
I cannot believe that I've reached 5000 followers over on Instagram! Thank you all so, so much! It means a lot to me. And in order to celebrate, what better way than a giveaway??!
This is a giveaway from me to you, featuring my favourite things that I use for my bullet journal at the moment. There will be one winner who will get the following:
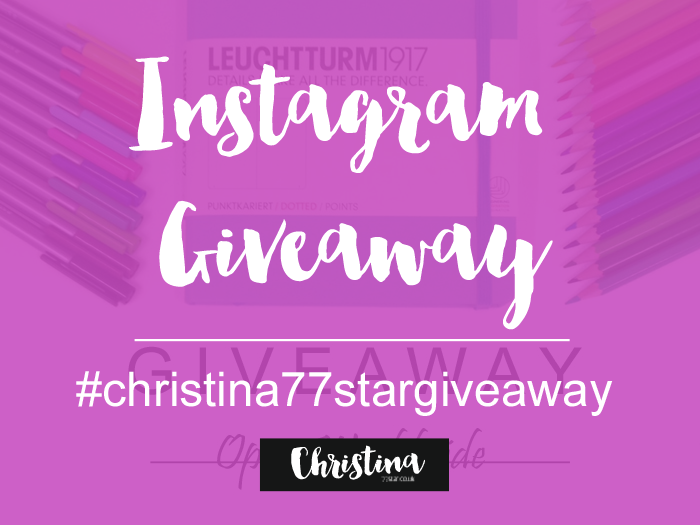
1. Follow me (@christina77star) on Instagram
2. Repost this image with the hashtag #christina77stargiveaway
Rules:
1. Enter by 11:59pm EST on June 4th.
2. One entry per person.
3. Must be over 18 years old to enter.
4. No private Instagram accounts.
5. No giveaway accounts.
6. The giveaway is open worldwide.
The winner will be announced on Monday 6th of June on my blog and on my Instagram account.
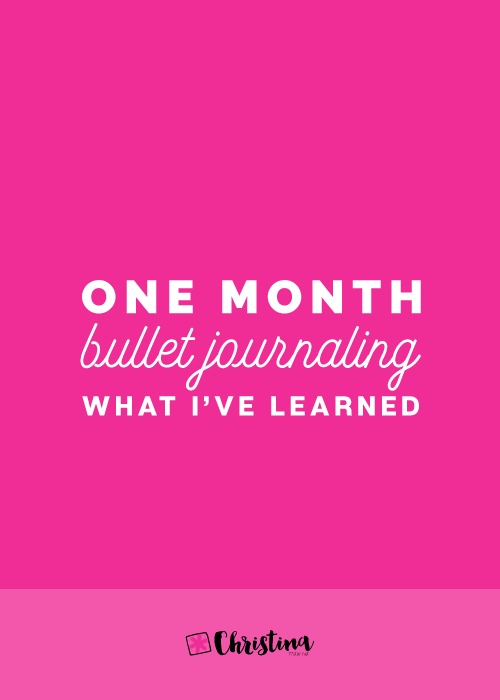
One Month Bullet Journaling: What I've Learned
If you've been following my blog for a while now, you must have noticed that I have a small addiction as far as my bullet journal is concerned! Put it plainly, I'm obsessed!!!

If you've been following my blog for a while now, you must have noticed that I have a small addiction as far as my bullet journal is concerned! Put it plainly, I'm obsessed!!!
Before I go on, a quick reminder of what Bullet Journaling is, for anyone that doesn't know:
It's an analog system for the digital age. It helps record the past organise the present and plan for the future. It can be your to-do list, sketchbook, notebook and diary and all the above.

That's how the creator of this system, Ryder Carroll, describes it in his very informative website that you must visit to see all the information and the detailed videos that thoroughly explain his system.
For me, bullet journaling has been an amazing experience so far! I found that it made me be more organized and focused on the tasks that needed to be done. It makes me be more creative and I also find it to be very therapeutic. At the same time, it worsens my addiction for pens and stationery - if that was possible!!!
A PEAK INTO MY BULLET JOURNAL
I'll add here some pictures of a few of the pages that I've created in my bullet journal this month. I can't show everything, but I've made a selection of the ones that I haven't shown before and that I really like. :)
After the 3 index pages the first page you come up to is one of my favourites. It's my word of the year and my mission statement. I like to come back to it and remind myself what my focus should be on this year.

I also decided to add a 'Useful Numbers' page. Moving to a new country means learning everything from scratch, including all the emergency//useful numbers :) It puts my mind at ease to know that I have this page in my bullet journal, plus my kids are old enough now to know what to do in case of an emergency.

A key page is one of the basic pages that you're supposed to add in your bullet journal. It basically shows the symbols and the colours you use in your bullet journal to indicate different things. While I've been using it I realised that some things were not working for me. For example, now for the tasks I prefer to use a dot instead of the box, because I found that all those little boxes made my pages look too crowded. I've also changed some of the colours because they didn't work for what I wanted (especially the turquoise I used for 'work' was bleeding through the pages so it had to be changed ASAP!).
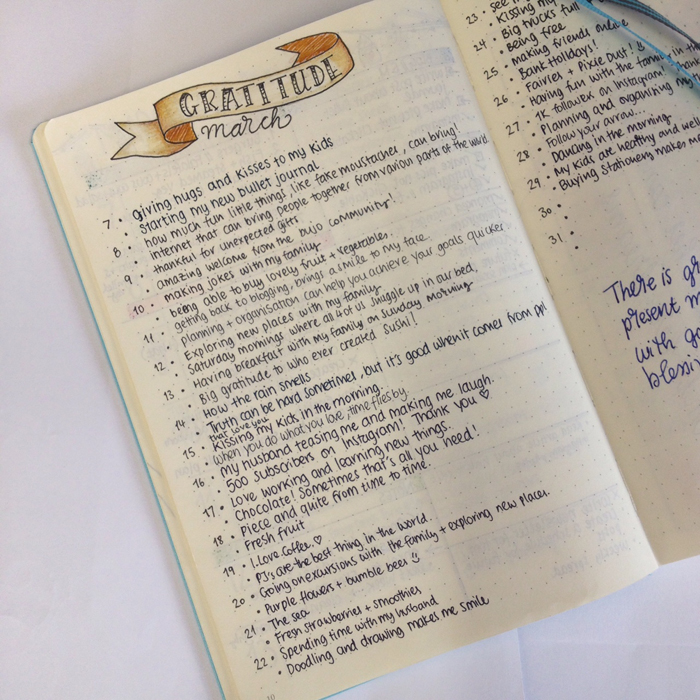
One of my most favourite pages in my bullet journal is my gratitude log. When I started writing it, I wasn't sure what to add to it every day. But pretty quickly I tuned into it and now I can't wait every night to think through of my day and add the two things that I'm most grateful of.
For my first month I also decided to create a doodle a day page, where I would draw something that reminds me of that day. It's been really fun and I love how colourful it looks.

I have been uploading lots of pictures with the progress of my bullet journal as I'm filling it in, so don't forget to check out my Instagram and Facebook accounts. You can also join my Newsletter!
THINGS THAT I'VE LEARNED
Even though I've been bullet journaling for only a month, some things became apparent to me straight away.
- Just Start
My bullet journal arrived a bit late in the post and the month had already started. So I was contemplating in the beginning whether to wait for the next month so that I start on the 1st, or not. I'm very happy that I started when I did and my advice to you is to just start! Don't wait. I promise you, you'll love it!
- Keep it Simple
When you first start bullet journaling, you might find yourself in the beginning being bombarded with various styles and ways of doing things. That can make you feel a bit overwhelmed and you might don't know where to start. Just keep things simple and start slowly. You don't have to add everything in your bullet journal straight away. There is no right order. What I did, was that I made a list of the things that I'd like to include in my bullet journal, and I've been adding them as I go along. The basic thing for me was to have a yearly, monthly, weekly and daily spread, so that I don't miss appointments and keep up with my everyday life. The rest can be added slowly.
- Trial and error
You just have to try and adjust the different methods available to suit your needs. That way you'll figure out what works for you and what doesn't. It's a simple case of trial and error. That's what has happened to me, especially with my weekly spreads. And if nothing works for you the way you want it, then create your own!
- Get Inspired
There is so much inspiration and creativity on line, it's unbelievable! You only have to do a search and you'll be amazed. By far, Instagram and Pinterest are the best places for BJ inspiration! The following IG accounts are some of my favourite: @boho.berry , @passion.themed.life, @maryj13, @tinyrayofsunshine, @therevisionguide, @write_it_on_the_wall, @wundertastischdesign ... and the list goes on!
- Community
There is an amazing bullet journal community out there, ready to welcome you and help you along the way! If you're interested in bullet journaling then you should totally check out the Bullet Journal Junkies group on Facebook.

- It doesn't have to be perfect
Whether your lines are not straight or you've made a mistake while writing down your daily spread, just don't worry about it! It happens.
You either use Pentel Presto and erase it or just ignore it like I did!
- Have Fun! :)
Enjoy your time while bullet journaling!
This pretty much sums up my first month with my bullet journal. Can't wait to start setting up for April. ;)


Calendex - How to future plan with your Bullet Journal
When I was first introduced to bullet journaling, one of the things that concerned me the most was future planning. On a system that you create your days as you go along, I wanted to make sure that I wouldn't miss any future events or appointments. While searching online, I came across 4 different ways to future plan with your bullet journal:


So, for example if I happen to have a future event, like the one I had for the Fairy Folk Fest, I will note it down on my daily spread and I will have a coloured box according to the type of event next to it. In this case it's light green because it was a kids' event.
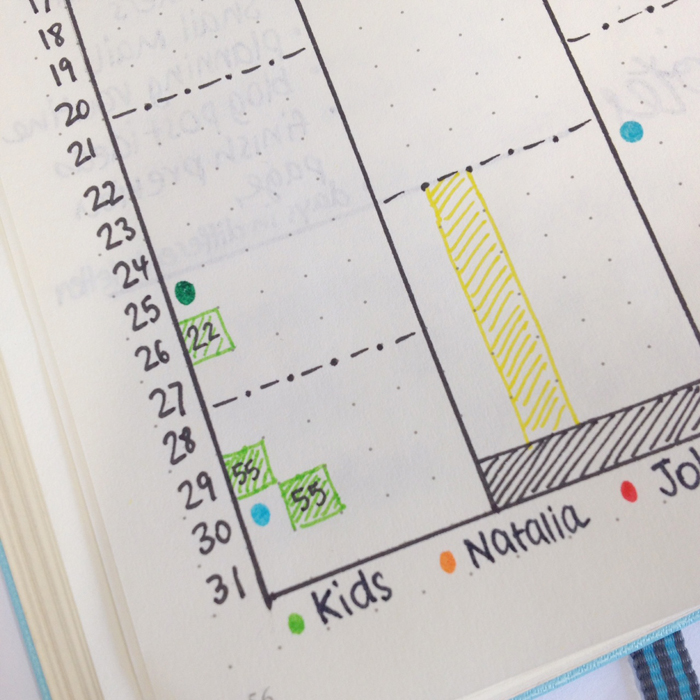
Then I will note down a light green box on the day of the event and on it I'll write the number of the page my daily spread was that I wrote all the information at (in this case, it was page 22).

My favourite bullet journal supplies
I've been getting a ton of questions lately about what supplies I am using for my bullet journaling. Especially after I posted these pictures on Instagram ( here and here ), everyone was asking what I used to create that shading. So, instead of answering each one individually, I decided to create a post where I talk about all my favourite supplies that I use at the moment.
So, relax, grab a cup of coffee and let's dive together to my happy place - the stationery world!

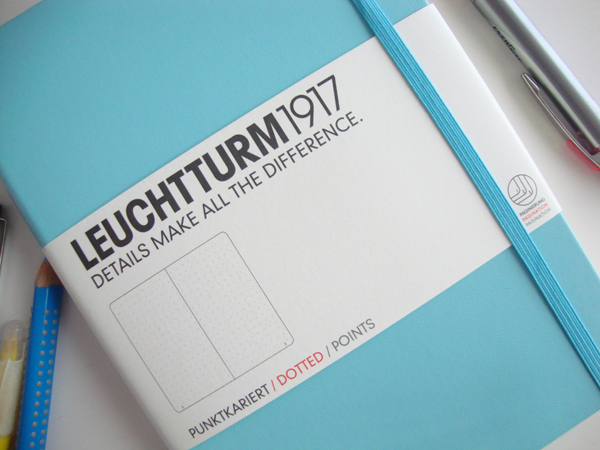
Leuchtturm1917
First stop is of course my Leuchtturm1917. Oh, I love this notebook so much! I haven't used any other (like the Moleskine or the original Bullet Journal) in order to be able to compare them, but I'm really pleased with my purchase and I love the colour <3. I am using the light blue A5 dotted one. I've already written a whole blog post about it and all it's characteristics with lots of pictures, if you want to check it out more here.
You can buy it here: Amazon
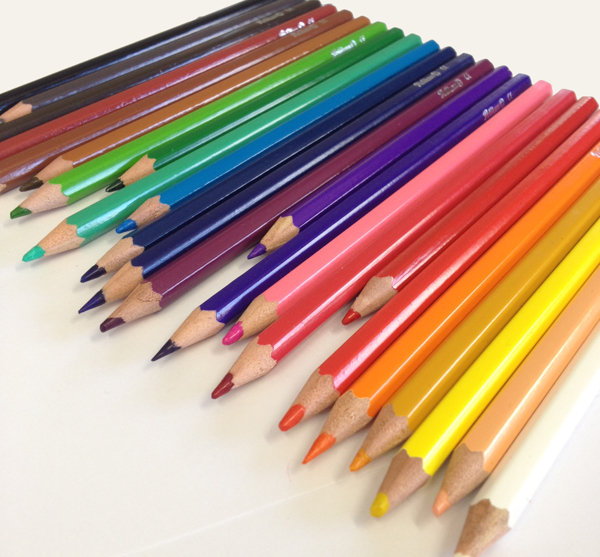
Pelikan Soft Coloured Pencils
Next are the soft coloured pencils that I'm using to do all the shading in my bullet journal. They are made by Pelikan and they come in a tin case with 24 bright and vivid colours that draw like a dream. If you're looking for colour pencils to create shading like me, make sure you choose soft pencils, so that you have a smooth application and less lines.

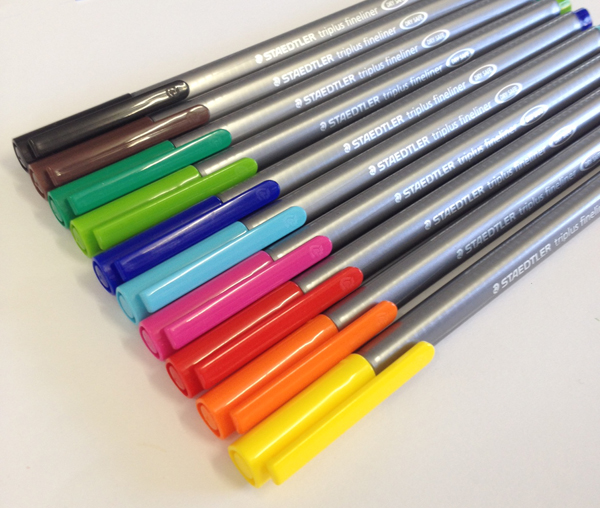
Staedtler Triplus Fineliners
These I feel have become a must in the bullet journal community, especially after Kara (from Boho Berry) has talked about them. And I have to agree - they are very, very good. With a fine tip of 0.3 and very little ghosting they are perfect for adding colour to your bullet journal on an everyday basis.
You can buy them here: Amazon
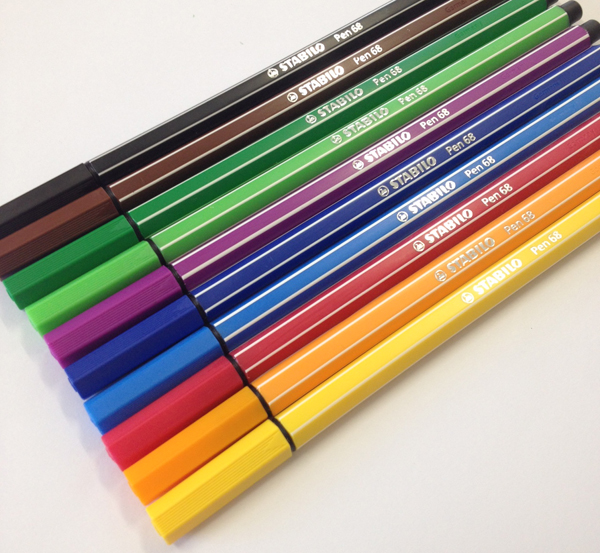
Stabilo 68 Pens
These are amazing! The colours are vivid and bright and you get very good pigmentation. They are water-based with an 1mm sturdy tip and they come in 46 colours. I have quite a few of them and I really really like them. And the best part of all is that you get only a bit of ghosting at the back of the page! I also sometimes use them before I start the shading, if I want a more intense colour in certain areas. They have a neon line that I really like as well. I also use their 2in1 pens which are equally good and you get two pens for the price of one! Especially the black one, I use it all the time.
You can buy them here: Amazon
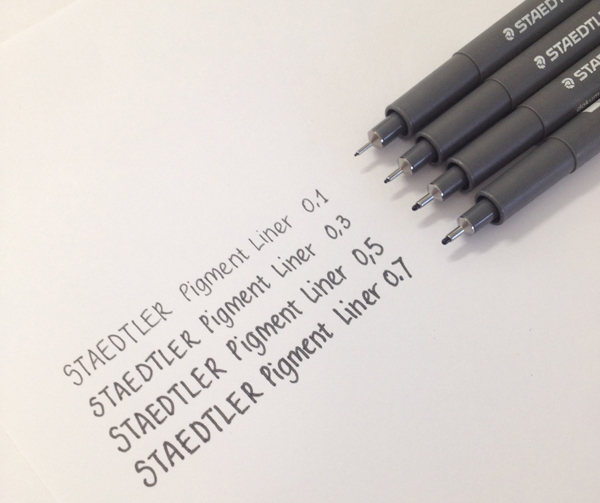
Staedtler Pigment Liners
These ones I use them e v e r y d a y! I love them! They are a bit off black - so don't expect the darkest of blacks with these babies, but I like it. They come in various tip sizes, and I have the 0.1, 0.3, 0.5 and 0.7 ones. By far my most used one is the 0.3. It's perfect for writing and drawing the lines around your sketches etc. The 0.1 is great if you want to draw something with great details. And the 0.5 and 0.7 are great for thick lines and titles. For thick lines I also use the Faber-Castell Broadpen 1554 one, which has an amazing shade of black with purple undertones.
You can buy them here: Amazon
Pens
As far as my favourite pens to write are concerned, I tend to change and use different ones all the time. I'm one of those people you see in the bookstores that tests all the pens and usually I buy 10 pens on my way out, even though I went in there to only buy a book for example!
My favourite pens right now are:
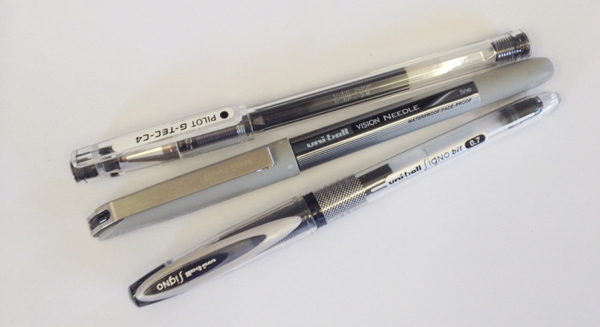
- Uniball Signo bit 0.7
This is my favourite one by far! Really nice dark black and very precise needle tip, that even though is 0.7mm writes pretty thin. Zero bleeding and only a bit of ghosting. It comes in an amazing light blue and one of the best greens I've ever used as well!
You can buy them here: Amazon
- Pilot G-Tec-C4
If you want great detail in your writing then look no further. These pens have a very smooth fine point with no smears and almost no ghosting. Just perfect! Only a few times I noticed that when you start to write, the ink might not flow as well and you might need to write on a piece of paper to get it started. But apart from that they're excellent. I have the blue colour as well that I like.
You can buy them here: Amazon
- Uniball Vision Needle 0.7
This one I like because of the tip but also because of the very different shade of black you get. It's a combination of black and grey ombre. That's the only way I can describe it. :)
You can buy it here: Amazon
Pencils
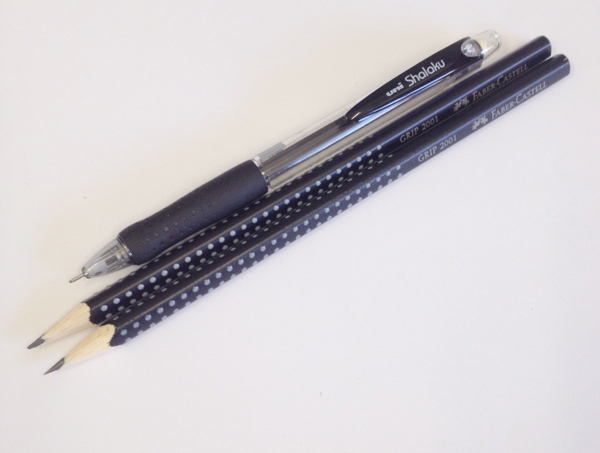
This list would not be complete if I didn't include my favourite pencils that I use everyday. I always use a pencil first in my drawings and sometimes I prefer to write in pencil too. I find that my handwriting looks better in pencil sometimes.
- I usually tend to draw with an HB pencil, for softer lines. The Faber-Castell ones are great and I really like the grip they have.
- When I write or I want more dark lines I use a 2B pencil. Again, I choose the Faber-Castell ones because I really like them.
- And last but definitely not least is my Uni Shalaku mechanical pencil that I absolutely love! It has the perfect grip and it's just so comfortable when I write. I have a lot of different mechanical pencils but I ALWAYS tend to reach for this one. I use it with the Faber-Castell Super-Polymer leads 0.7HB
Of course, as a proper stationery addict my wishlist is quite big, and since I've started my bullet journal it gets bigger and bigger! My next purchases will definitely be the Tombow Dual Brush Pen Art Markers, the Faber-Castell PITT artist pens, and the Sakura Pigma Micron Pens.
I would LOVE to know your favourite supplies and stationery that you use for your bullet journal. So, make sure you let me know in the comments bellow ;)
Have a nice day