

58th Ave Bullet Journal Review + Giveaway!
I was contacted by the lovely Sonja from 58th Ave to review their notebook, and of course I said yes! It's so nice that lately more and more new bullet journals make their appearance in the market. I remember when I started bullet journaling, there were less than 5 brands that made notebooks with bullets. So, I love it every time I get to review a new bullet journal ☺️

I was contacted by the lovely Sonja from 58th Ave to review their notebook, and of course I said yes! It's so nice that lately more and more new bullet journals make their appearance in the market. I remember when I started bullet journaling, there were less than 5 brands that made notebooks with bullets. So, I love it every time I get to review a new bullet journal ☺️

The bullet journal arrived beautifully packaged in a cardboard box.


Inside there were a lovely thank you note, the notebook, 4 stencils and 10 colourful washi tapes! My favourite kind of mail


The notebook comes in a black leather cover with embossed '58th Ave Just Because'. I loved the little details and the cover is of very good quality. Also I appreciated the protector that was placed underneath the elastic band. Sometimes, especially when the products are shipped, the elastic band can leave and indentation on the cover. So, that was a nice touch, and I have to say I haven't seen anyone else do that yet.
The size of the notebook is a bit smaller than an A5 one. More specifically, it is 13 x 21 cm.

As I mentioned, there is an elastic band to keep the cover closed, which is very sturdy and tight.

Another new thing that I haven't seen in any other bullet journal, is that the very first page is all black. I think that this is so cool, and you can definitely decorate it with pictures, stickers or a white pen. The black background will make everything pop.

The notebook starts on the bullet pages straight away, and there is no other page before that.

The pages are numbered which is always nice to have that. Especially if you like to have an index for your bullet journal.

At the back there is a black expandable inner pocket, which I always find very useful for stickers or little notes and stuff.

The notebook also comes with 3 page markers which I really like. It's nice to have more than one to mark the pages you use over and over through the month. I only wish they came in 3 different colours, so that I can differentiate straight away on what page is what. But still a nice add to the notebook.
The paper used in this notebook is 100gsm and the pages are thread bound, which means that the journal is more sturdy and it can lay flat for ease of use.
The quality of the pages is really good. When I first touched it, it reminded me of the Moteskine pages, which are so nice and smooth. And I have to say that after I tested them, the pens just glide on these pages!


As you can see there is no bleeding and not much ghosting.


The packet also came with 4 stencils and 10 colourful washi tapes. It was so fun playing around with those.

I must admit that I hadn't tried any stencils before, and I really like those. They are very useful. You can add nice touches to your pages, even if you can't sketch or draw.

Also the washi tapes are nice and thin to add on your pages for decoration or to create sections, borders and categories.

GIVEAWAY 🎉
I've teamed up with 58th Ave to offer 3 similar packs like the one I just reviewed for 3 lucky winners! So, if you liked the notebook and the accessories that come with it, then you can take part in this giveaway that is open internationally!
RULES:
- Like the giveaway photo on Instagram.
- Follow me @christina77star on Instagram.
- Tag as many friends as you want ( ONE FRIEND PER COMMENT).
- Extra Entry: For extra credits, leave a comment below, telling me what you love about bullet journaling.
PRIZES FOR 3 WINNERS:
- 1 58th Ave Notebook A5 size
- 4 Stencils
- 10 colourful washi tapes
DETAILS:
- The giveaway is open internationally and it will end at 11:59pm (GMT + 2) on the 15th of March.
- The winners will be picked randomly, and will be messaged within 48 hours after the giveaway is closed.
- If any of the winners doesn’t reply to my message within 24 hours, I will pick a new winner.
Good Luck everyone! 🍀

Plan With Me: My March Set Up in my Bullet Journal + Video
In today's post I’m going to show you how I've set up my bullet journal for March. March will be the first month that I'll be fully settled in the new house and that means that I can finally focus on my projects and planning. For that reason you'll see as well that I'm introducing some new spreads that will help me to focus more this month and be more productive.

In today's post I’m going to show you how I've set up my bullet journal for March. March will be the first month that I'll be fully settled in the new house and that means that I can finally focus on my projects and planning. For that reason you'll see as well that I'm introducing some new spreads that will help me to focus more this month and be more productive.
Make sure you scroll down to the bottom of the post, because there's also a video, where I'm showing you exactly how I've created each spread.

Before I start with the monthly set up, I'd like to take a minute to express how much I love this notebook! It's the Scribbles That Matter notebook and the quality of the pages is amazing! I highly recommend it! You can find a thorough review here.
This month I decided to create all my pages following the same theme. I watch all these amazing videos on YouTube on bullet journaling and every month the designs look really nice. So I decided to give it a go and do the same. I contemplated for a while on the theme I wanted to go for. I wanted something easy and relevant but I didn't want to do another flower theme that is the most popular one for this season. So, after some thought I decided to go with clouds and little paper boats, and I'm really excited with the way it turned out.

So, the first page of the month I decided to keep it quite simple with a few clouds and a paper boat on one of them. It was hard to not use my cute penguin calendar, but I think it still turned out cute and nice. I also added the March calendar underneath to add balance to the picture.
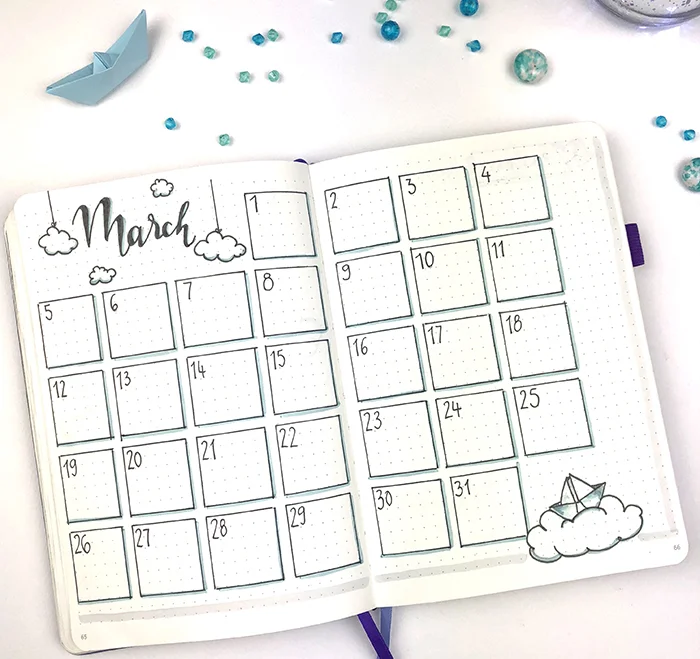
For my monthly spread I chose again the grid layout, but I decided to keep the boxes separate. I found that when you create the grid with the boxes connected to each other, unavoidably there will be a column of boxes in-between the pages that made it very difficult to write in them. So, by keeping a space between the boxes you can get a much better layout. Each box is 6x6 except from the first column that is 5x6. And of course the theme continues here as well.

The next page is all about my goals for the month. I kept it very simple with only two categories - Personal and Business. I try to keep things simple and more focused this month, and with these two categories I can focus on all the things that I want.

The next page is my monthly focus. I found this in 'Your Best Year 2018' by Lisa Jacobs and I really really like that idea, so I decided to added it in my bullet journal as well. These are my monthly objectives summarised in 5 categories that include Financial, Spiritual, Mental, Physical and Relational.
These are the five pillars of a harmonic life, as taught in 'Harmonic Wealth: The Secret of attracting the life you want' by James Arthur Ray. And on this page you basically write what you want to improve during this month in each of those categories. It's just another way to help you focus more on specific areas of your life in order to move forward and make changes.

This next spread is again inspired by 'Your Best Year 2018'. I like how Lisa helps you to organise your thoughts and what you have to do during the month. On the left hand page is the areas of focus, where I will write everything I want to do during March. Then I'll take it a step further and I will be more analytical by writing all the steps I need to take in order for everything to be done. After that, I will take those steps and I will group them as the tasks that need to be completed in the 4 weeks of the month. That way, I know exactly what I need to do each week in order to have a successful month, so that I will finish all my projects and tick off all the things from my to-do list.

Next comes my finances page for March. I usually keep this spread in another notebook I have, but I find it tiresome to go back and forth to different notebooks all the time, so I decided to add it in my monthly set up, instead. This is a very basic spread for my income and my expenses. It's good to track your finances, and keep up with your money and how you spend it.

As always, I add a notes page in my monthly set up. The notes page is one of my most used and visited pages during the month. I like to write everything that comes to my head that I want to remember, ideas, and notes that don't have a place anywhere else in my bullet journal. Sometimes I even add post-it notes or I stick pieces of paper and photos. And by the end of the month it definitely doesn't look as nice and clean as this! But I don't mind 😉⠀

For the next spread I was inspired by Sarah Churchill on YouTube. This is my 'one line per day' spread which I basically try to write something every day. It is like a journal - it could be a thought, it could be something that happened during that day, a quote I liked or anything else I want to remember about that particular day. And even though it says that it's a line per day, I added two lines for each day of the month, because I like to have more space to write things down.

The next spread is again something that I saw in Sarah's video and I really wanted to give it a try for March. It's a self love log, where I write one thing I like about myself each day. After looking online, I saw more people mentioning this page as well, and I believe it started from Caitlin's Corner, so I thought I should mention her here as well.
I think a lot of people (including myself) find it difficult to come up with things to love yourself about. It's easier to be hard on ourselves and when it comes to showing some love, people mistake it for arrogance sometimes. So this spread will help me to be nice to myself and find 31 things that I love about me. Let's see what I'll come up with!

Moving on we come to my exercise log. Basically I like to note down when I exercise and what type of exercise I do, how long etc.
I did terribly last month and I have to get back to the way I used to exercise before. I can't seem to make it a habit to exercise at least 3-4 times a week, and this spread is my attempt to persuade myself to exercise more often. I admit that I don't feel very good when I look back at the February's exercise log page, so hopefully this month I'll try harder and make myself proud! If you have any advise on how you push yourself to exercise during the week, please let me know in the comments below.
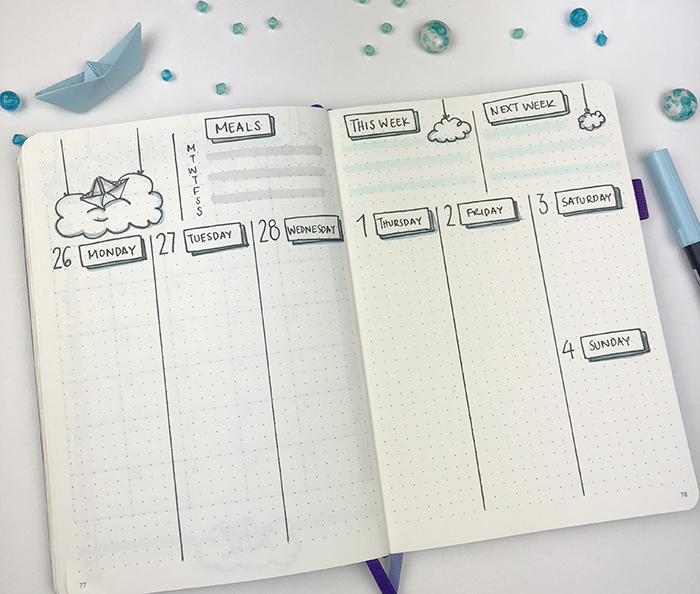
And the last spread is the first weekly spread of the month. This is the third time I'm using this weekly spread layout and I really like it. This time though I incorporated the theme of the month with the paper boat and the clouds. Do you have any go to weekly spreads that you seem to use over and over? Comment below and let me know. (Spread inspired by @penpapersoul)
You can watch also the video here, to see exactly how I created each spread:
SUPPLIES I USED:
- Scribbles That Matter notebook
- Staedtler Pigment Liner 0.2 and 0.6
- Tombow Dual Brush Markers (451, 491 and N75)
- Stabilo Trio 2 in 1 in black
- Zebra Mildliners (Smoke Blue and Grey) You can purchase them from kawaiipenshop with free international shipping. Use the code christina77star to get a 10% discount.
And that is one more month planned in my bullet journal. Have you finished your setup for March? What theme did you choose for this month? Let me know in the comments below. Also, if you use the same theme like me, please send me a picture of it at christina77star@gmail.com


How to Effectively plan your Week
When it comes to organising and planning your week, a lot of times it feels like the weeks fly by so quickly that you can’t help but ask yourself “Where did the time go?”.
I know. I’ve been there. Many times!
I used to constantly complain that ‘I don’t have enough time!’ and wish for more hours in the day.
Bullet journaling has helped me set up a process of effectively planning my week.

When it comes to organising and planning your week, a lot of times it feels like the weeks fly by so quickly that you can’t help but ask yourself “Where did the time go?”.
I know. I’ve been there. Many times!
I used to constantly complain that ‘I don’t have enough time!’ and wish for more hours in the day.
Bullet journaling has helped me set up a process of effectively planning my week. It’s a 6-Step process that I’ve followed religiously for the past year or so. This process helps me stay focused and finish most of the tasks and goals I set myself each week.
Before you start organising and planning your week, you should plan out how your Ideal Day looks like. This will show you how you spend your time during the day, and how many hours you have for each category of tasks. This is very important so that you don’t over plan your days.

So, for example, I know that I usually have 3 hours in the morning to work. This is the time that the kids are at school and I can focus more on my tasks. So, it’s my most productive time of the day and that helps me to plan it accordingly.
My 6-Step Weekly Planning Process:
1 | Create a schedule every Sunday for the upcoming week
Make a habit of planning your week on a Sunday. This helps you to know what needs to be done and be ready for the week ahead, instead of Monday coming and you be staring at your empty to-do list.
You should also make it something you look forward to. Put on your favourite relaxing music. Pour a cup of your favourite tea or coffee. Make this ‘your’ time.
2 | Set up your Weekly Spread
If you’re using a bullet journal, now it’s the time to get creative and set up your weekly log. You can use a layout you’ve used before and it works for you, or you can get inspired by searching online.

What I tend to do during the week is checking on Instagram how everyone else has set up their weeklies, and if I see something I like I take a picture. Then, when Sunday comes I don’t start searching all through the web for inspiration. I just check out the pictures I’ve taken during the week, and get inspired by them.
3 | Write the recurring tasks that take place on specific days
Start filling in your weekly spread by adding all the recurring tasks. For example, I know that every Thursday morning I do all my shopping and errants. Therefore, I know not to plan anything at that time. But I still make sure to note it down in my planner.
4 | Write all the events, appointments and meetings
Go through your future log and see if there’s any events or appointments scheduled for each day. Note them down on your weekly with all the details (time, place etc.)
5 | Make a list of all the things that need to get done within the week
On a different page start making a list with everything that you have to do in the week. This should include everything such as assignments, events, chores, projects and deadlines.
- I tend to add things in categories. Usually I have 4 categories: Work, Kids, Home and Me. I also colour code them in the same way I did in my Ideal Day plan.
- When it comes to projects and assignments, I like to break them down even further on my list into smaller steps. I also like to add the time that I think it will take me to finish each one.
- Also don’t forget to include in this list all the things that you didn’t finish last week.
6 | See how much time is left on each day
Go back in your weekly and see how much time is left on each day. Check your list you’ve created and then start adding tasks to each day. Checking your ideal day plan and the time you’ve allocated for each task really helps to plan each day effectively.
A few tips:
Everything takes longer than you think.
I’ve done this so many times in the past! I'd plan tasks that I thought it would take 1 hour to finish, only to find out that in reality it took me close to 2 hours! That’s why now I tend to add more time than I think to each task.
Do not fill in every second of every day.
Unexpected things will always come up, so make sure you give yourself windows of “buffer time”, to take care of last-minute things.
Know you won’t get it all done.
Even with great planning, I tend to be over ambitious and plan more things that I can handle. Be okay with not ticking off everything on your list, and transferring things to the next week if need.
Schedule the most important things early in the week.
Monday is by far my most productive day! I guess that I’m more focused and I seem to get more things done in the first two days of the week than the rest!
It’s also good to plan your most important tasks in the beginning of the week, so that no matter what comes up, these will most probably get done or you’ll at least have time to change things around.
How do you use planning to make the best use of your time? Let me know in the comments below.


Daily Plan Bar for your Bullet Journal
For me, time management is one of the most important things in my daily planning. I tend to get distracted left, right and centre with the result of not finishing my tasks and projects. Keeping these distractions to a minimum and finding things that can help me to focus on the tasks at hand are imperative for me. In today’s postI’m going to talk about something that I've been adding to my daily spreads lately and which helps me to manage my time even better.
For me, time management is one of the most important things in my daily planning. I tend to get distracted left, right and centre with the result of not finishing my tasks and projects. Keeping these distractions to a minimum and finding things that can help me to focus on the tasks at hand are imperative for me. In today’s postI’m going to talk about something that I've been adding to my daily spreads lately and which helps me to manage my time even better.
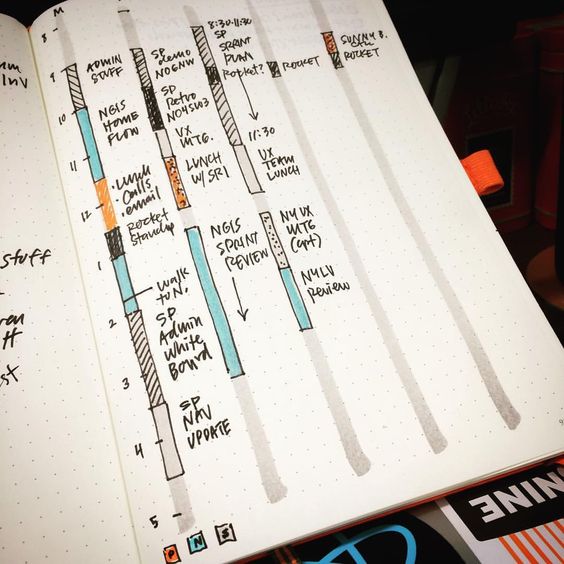
The new thing that i’ve been implementing in my daily planning is called ‘daily plan bar’. It was created by Mike Rohde who was in turn inspired by Bill Westerman.
What is a daily plan bar?
It mainly is a vertical bar where you note the times during the day and then you go and either colour or sketch parts of it that you allocate for different events or tasks. This way you are blocking out time during the day to do a certain things.
It looks and sounds like a timeline but it is a vertical version of it and it’s also more detailed.
How to create it
On the page where you create your daily spread create your daily header as usual and on the left hand side create a vertical bar by drawing two vertical lines or by filling in the space with I highlighter like I did.

It’s up to you from what time you’ll start your daily plan bar. For example, Mike Rohde starts his from 8 o’clock (picture below), whereas I prefer to start my day way earlier and so my bar starts from 6am.
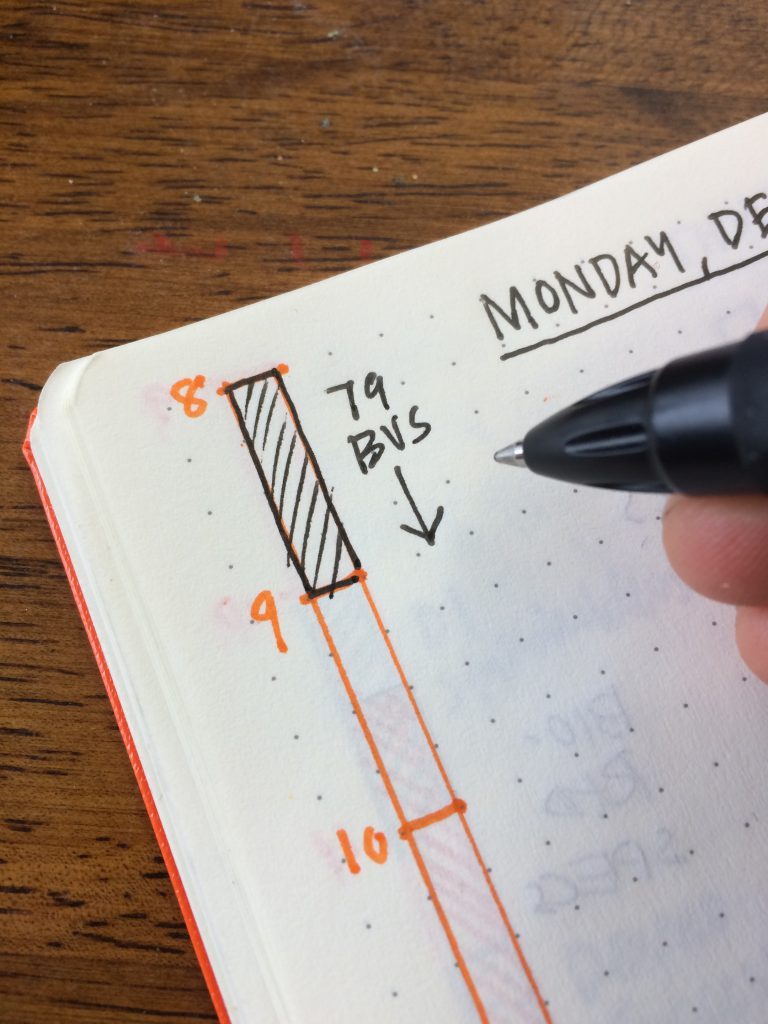
It’s also up to you how much space you’ll leave in-between the hours.


As you can see in the pictures above, on one day I chose to represent each hour with a square on the page, whereas on the other picture you can see that each hour has three squares. Also, Mike Rohde has 4 squares for each hour. The space you leave between each hour depends on if you have lots of things to do and note within that hour. Having more space means that you can mark mark time blocks of 15 or 30 mins, and that you can be more detailed with the time you allocate for each task. And even though you can still mark the 30min time block with the 1 square space between the hours, (by colouring half a square as you can see in the picture above), it doesn’t give you enough space to write in-between.

Stickers used from my Etsy store
Once you’ve set up your daily plan bar, then you can start time blocking and mapping your day ahead. You can choose to use colour coding to time block and separate the different tasks and events, or you can use shapes and doodles to do that.

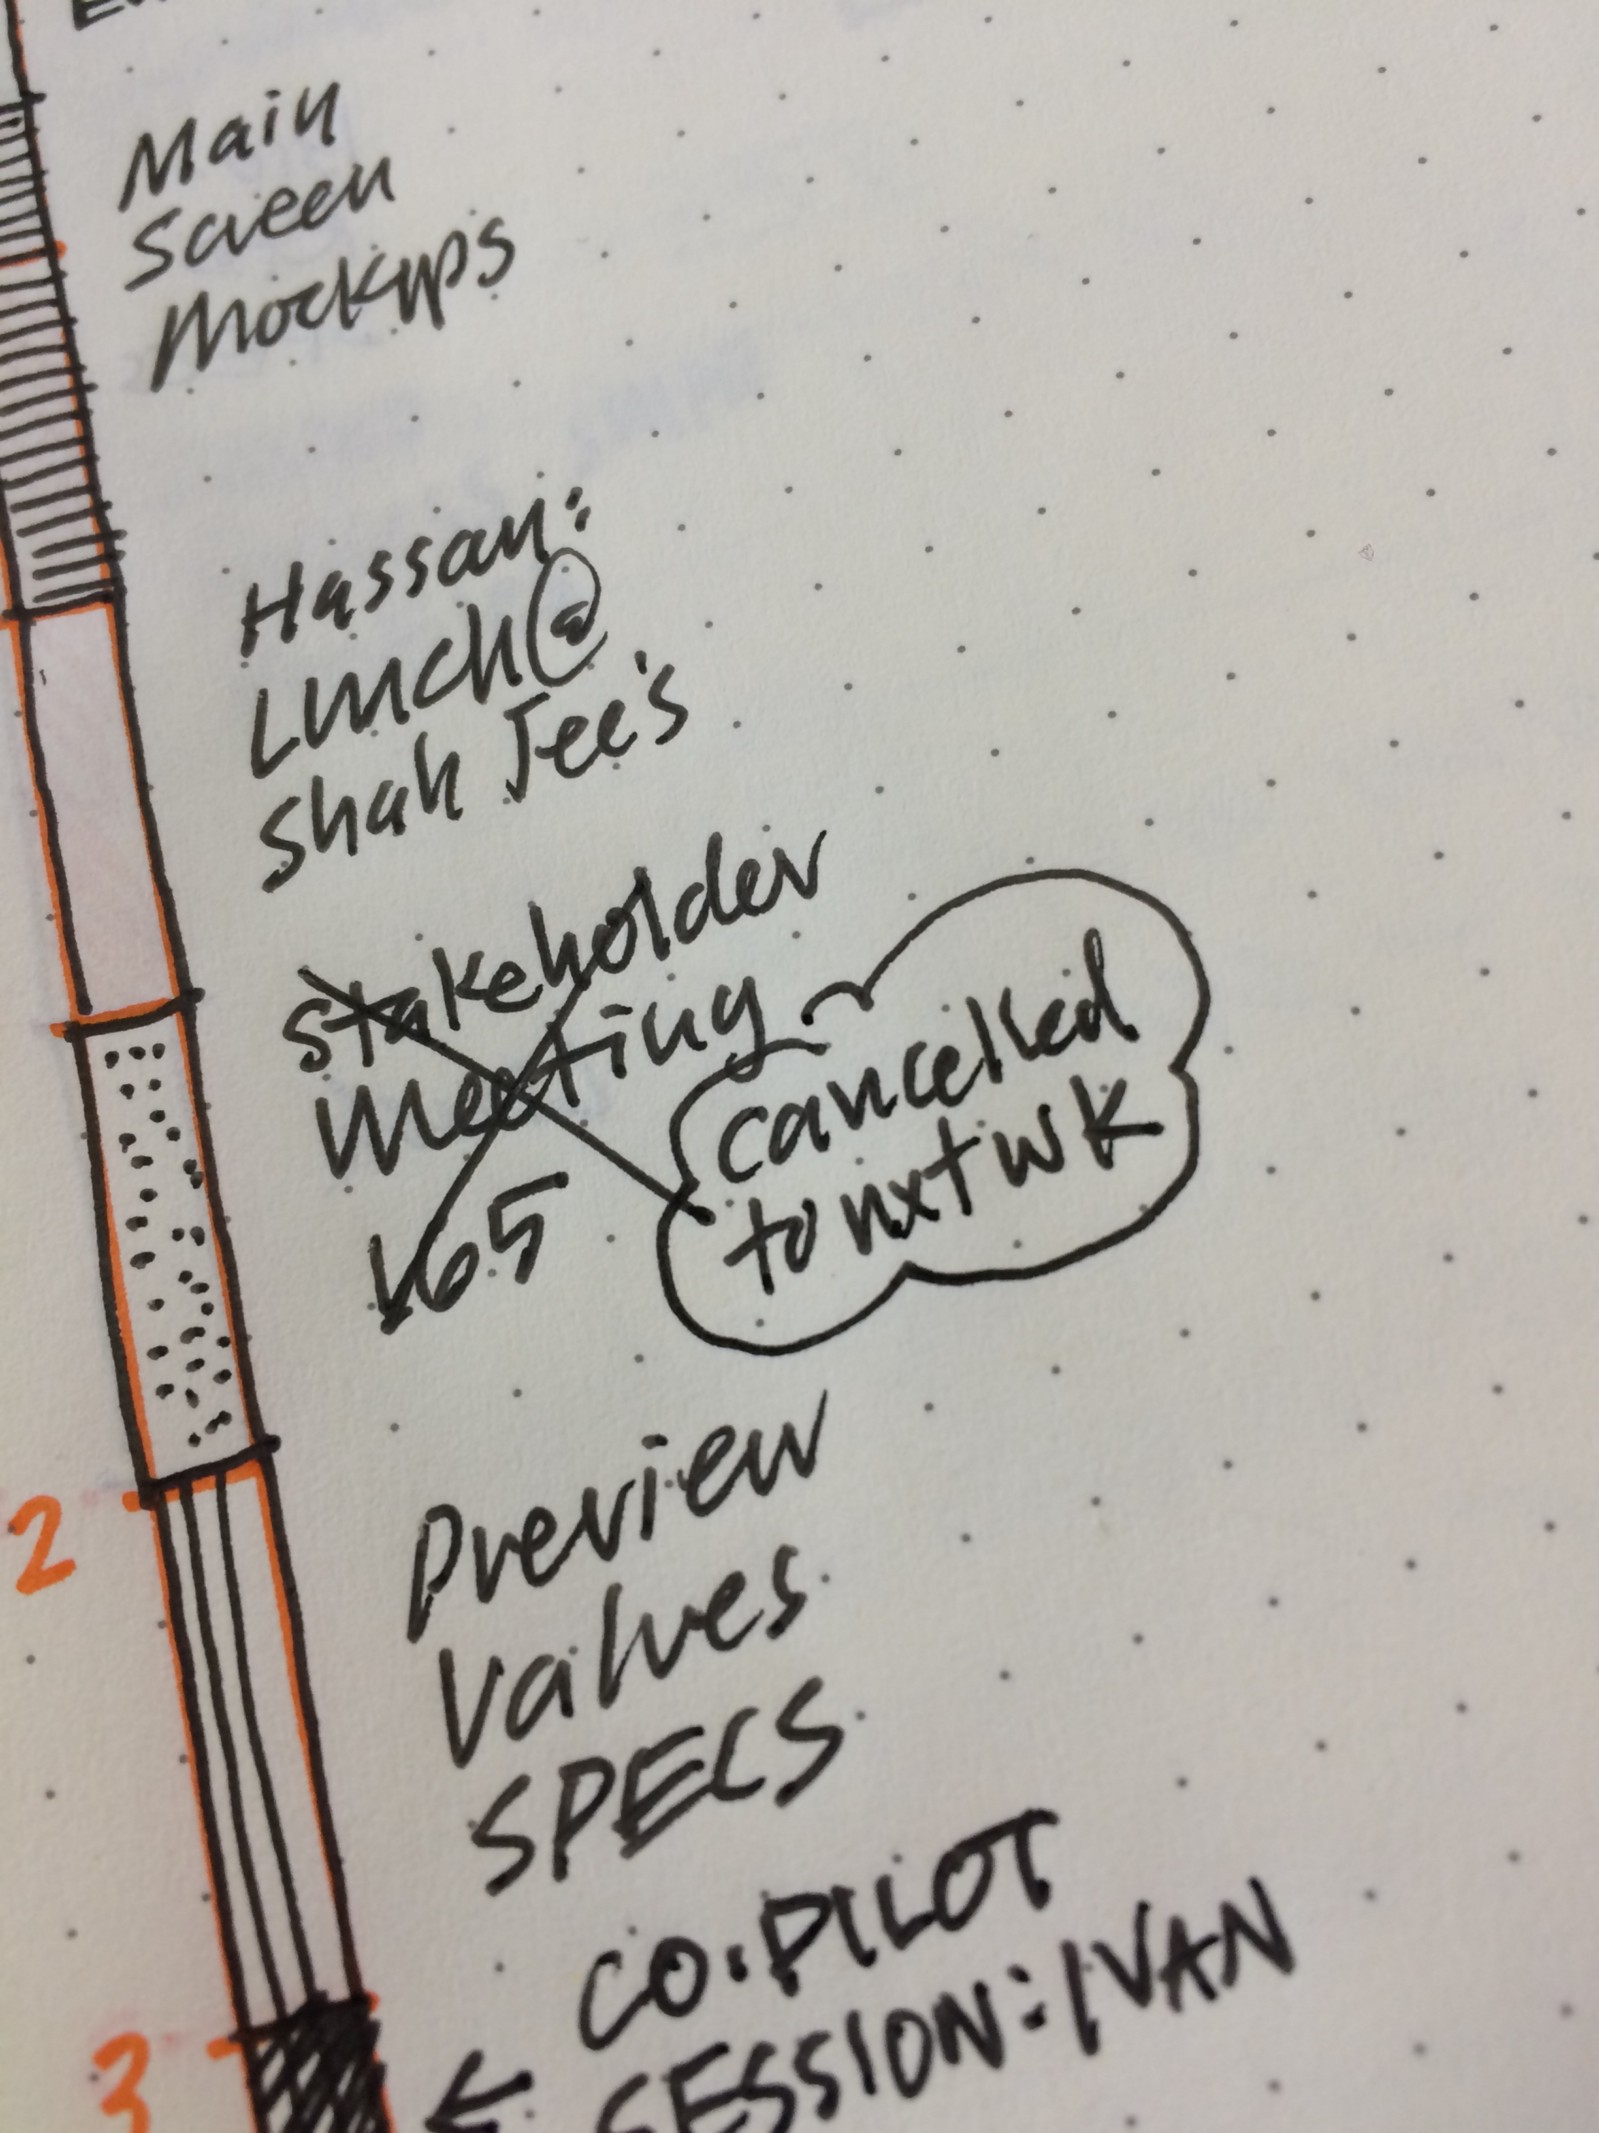
You can make changes and re-shuffle things as your day unfolds. If something is cancelled, you can simply cross it off and add a note next to it for more information or with the new time and date of the event.

The rest of the page, is left for you to add your to-do list or you can doodle and journal.
How it can help you in your time management
The daily plan bar can really help you focus on your day and the way you use your time. It’s really easy when you sit down in the evening to plan the following day to create that bar and see how your day unfolds and how busy it is. It is also very helpful so that you don’t over plan and fill your schedule with things and events that you simply don’t have time to do.
How you can use it for weekly planning

You can use the daily plan bar for your weekly planning by adding a bar for each day of the week on one page. That way you can see at a glance how the rest of your week looks like and how busy it is. That can help you to schedule even more things (if you have time during that day) or to re-arrange things for a later time.
What do you think of the daily plan bar? Have you used it before?
Christina x
Complaint Free: A 21-Day Challenge

While reading Edwene Gaines's book "The Four Spiritual Laws of Prosperity: A Simple Guide to Unlimited Abundance", I came up to the chapter where she was talking about the 21-day challenge she set for herself in order to stop complaining and criticising. I admit I was intrigued. The more I read, the more I was excited to try this. So today, I'd like to share with you the new challenge I'm setting myself up for the next 21 days.
How does it work?
You make the commitment that for 21 days you will not gossip, criticize or complain to others or to yourself. Nothing negative said at all for 21 days. No matter what happens during that time, you should not complain. If you slip and say something negative, you'll just have to forgive yourself and then start all over again for another 21 days. So, as Edwene says in her book "on the 20th day you must be very, very careful!"What is a complaint?
According to the dictionary, it is when we express pain, grief and discontent. It is a statement that something is unsatisfactory or unacceptable.However it should not be confused with being neutral and just stating facts.
'Complaining is not to be confused with informing someone of a mistake or deficiency so that it can be put right. And to refrain from complaining doesn't necessarily mean putting up with bad service, quality or behaviour. There is no ego in telling the waiter your soup is cold and needs to be heated up, if you stick to the facts and you're always neutral.'
Eckhart Tolle
Why do we complain?
There are 5 reasons that explain our tendency to complain. People usually do it because they want to:1. Get attention
2. Remove Responsibility
3. Inspire Envy
4. Power
5. Excuse Poor Performance
Why 21 days?
It was found that it takes 21 days for someone to form a new habit. Some might argue that this is wrong and that it actually takes more days than that, but I'm happy to try for 21 days and make sure I continue to do the same after that.What is wrong with complaining?
Well, if you like to complain, then by all means go right ahead. However, when you complain, you keep being focused on the problem and not the solution. It can damage your health, be destructive to your relationships and limit your career success. When you stop complaining, you remove all the negativity around you and you are happier.
Will Bowen has written the book "A Complaint Free World". He handed out purple bracelets to inspire people to give up complaining and his ideas have exploded around the world with 6.2 million bracelets being shipped to 106 countries. (You can get the purple bracelet from his website)
I loved watching his video and listening to him explaining what the whole concept is all about and how to actually do it. So, I've decided to do this for the next 21 days starting from today.
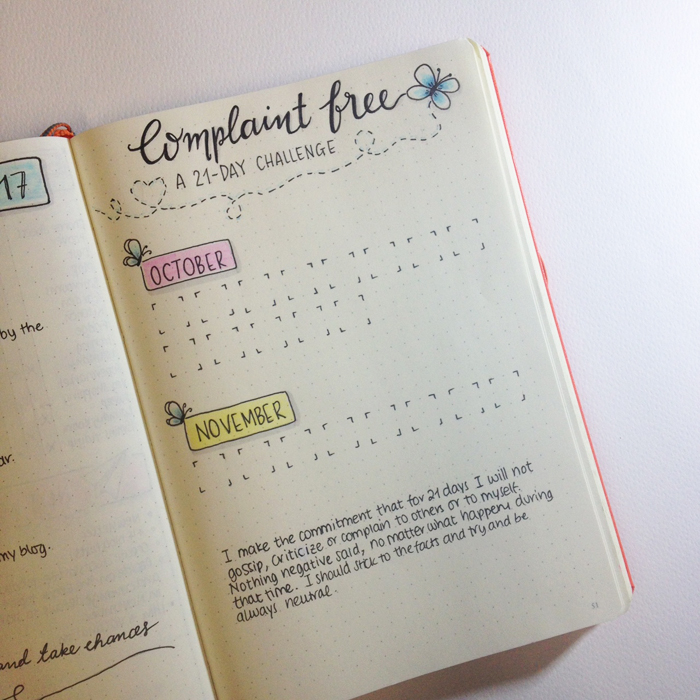
I made myself a nice spread in my bullet journal to track my progress with a calendar of 21 days to tick off as I go along. I don't have a purple bracelet, but I have a nice black one that'll work just fine. I'm ready for this!


17 before 2017
After reading Lisa's and Kara's posts and of course after starting to read the 'Your Best Year 2017' book, I'm all pumped up and ready to finish 2016 strong. And what better way but to create 17 goals to accomplish in the time that's left (no pressure there!)
So, in this post I'll share with you both my personal and work related goals that I'd like to achieve by the end of 2016. Let's do this!
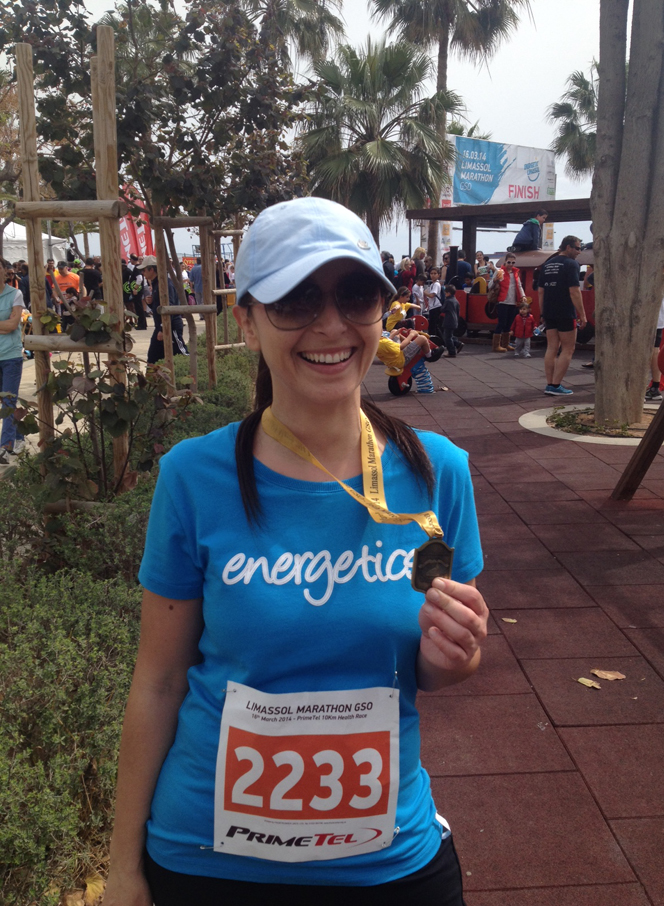
#1. Start training for my 10K run.
I've decided to take part once again to the Limassol Marathon that's taking place on the 19th of March 2017. I'm quite out of shape at the moment. I've been walking and swimming almost every day for the past 3 months, but I haven't run for a while now. My plan is to do the 5K Runner app. first and then to move on to the 5K to 10K app. If I start this week, then I can finish the first app on time and run for 5K before Christmas, which is my goal. Then I'll have enough time to train more in the new year.
 #2. Clean Diet.
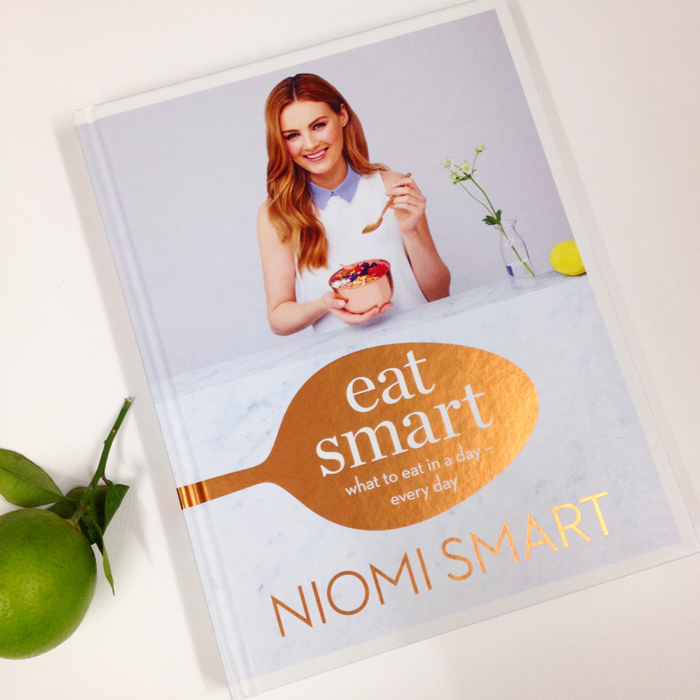
I've noticed that I've been having lots of cravings lately for sweet treats and I keep on messing my diet with silly foods. I just need to be more aware of what I'm eating, look at the labels for the ingredients and find natural, better for you alternatives to satisfy my appetite. I've currently bought the book 'Eat Smart' by Niomi Smart and I love it. My goal is to make it a habit of eating like this and lose at least 2kgs by Xmas.
#3. Go for a bike ride with all the family by the sea front.
Since the weather is still really nice here in Cyprus, I should take this opportunity and go for a ride with our bikes by the sea front with my kids and my husband. My kids learned to ride their bikes without stabilizers recently and they're very excited about it. So, this would be a great idea to plan a fun day by the sea for the 4 of us. I just need to buy them safety helmets and we're good to go. I should make arrangements to do it before the end of October.
#4. Decorate my living room.
I've been meaning to do this for such a long time and I keep on postponing it. But I think it would be nice to decorate the living room and have everything nicely done before Xmas. I'm thinking of a cozy and warm decor with lots of Moroccan vibes, where I can add colour with accessories and pillows. I've created a board in my Pinterest account that I've already started to add inspiration photos. Now I need to set my budget, make a list of what's needed and do my market research.#5. Revamp my wardrobe.
I plan to do this every year, but I just never do. I keep clothes that I haven't worn for years, and quite frankly I don't think I'll wear again, so I really need to do this. I have to separate the things I want to keep for sentimental value and store them in the attic, the things I don't want any more and arrange to give them to charity and lastly the things I want to keep. Then, I'll write down a list with all the items I need to buy and go shopping! (that's the fun part!). Again Pinterest comes to the rescue - my go to place to find inspiration for the style I want to have and nice and cute outfit combinations ideas.
#6. Family Excursions.
I want to plan 2-3 fun excursions with the family. It's the perfect time to spend quality time together, visit new places and go on hikes or nature trails. I'm already planning the first one for the 27th of October, where we'll get to visit some villages, walk by the river and have a pic nic. Hopefully everyone will have lots of fun and the river won't be that cold! If it snows up in the mountains, I'd like to take the kids for another excursion to play with the snow before the end of the year.#7. Invite friends over for dinner.
I want to cook a 3 course meal from scratch by myself and invite some friends for dinner. That thought is a bit scary, cause I'm not the world's best cook but I really want to give it a try and be the best hostess I can!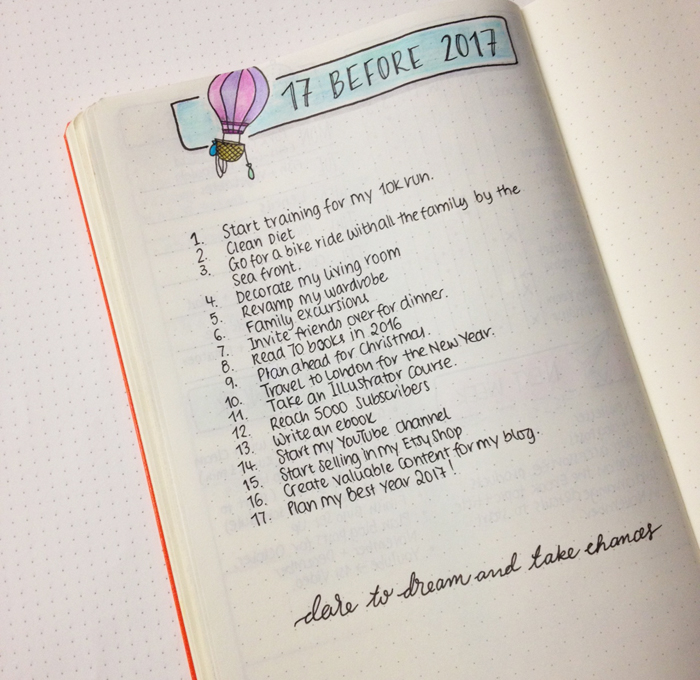
#8. Read 70 books in 2016.
So many books, so little time! I've already read 52 books so far and I'm sure I can reach my target of 70 books before the end of the year. If you'd like to see my reading challenge, find me on Goodreads.#9. Plan ahead for Christmas.
I want to plan Xmas properly this year for the family, with lots of activities and things to do for the kids. I want to make it a time to remember, create new traditions and amazing memories for them. I already have lots of ideas, but of course I'm planning to create a list in my Bullet Journal to make sure I don't forget anything! How do you make Xmas special for your family? Let me know in the comments below ;)#10. Travel to London for the New Year.
We've already booked the tickets and have arranged for accomodation. But there's so many things I want to do when we're in London that I really need to start planning right away! Everyone is very excited and I can't wait to fly back to London. It's been too long...#11. Take an Illustrator course.
Lately I have a lot of ideas of things I want to do and create, and lots of times I've realised that I need to use the Illustrator for them. I'm quite good with Photoshop, but I haven't used Illustrator, so I'd like to take a course to get myself acquainted with this software and start using it for my future projects. I also need to subscribe to Adobe Creative Cloud.#12. Reach 5000 Subscribers
When I started blogging, I never thought that I would get that many subscribers! Actually, when I started my Newsletter, I seriously didn't think that anyone would be interested in what I was offering, and I remember having second thoughts about it. But when people started joining in and subscribing, I was over the moon! Right now I have over 2800 subscribers and I'd love to reach 5000 by the end of the year!If you haven't joined my Newsletter yet, now it's the perfect time to do it! ;)
#13. Write an ebook.
I've always wanted to do that, but I kept holding myself back. Well, not any more! I want to plan, schedule and write an ebook before the end of the year. I haven't decided 100% on the title just yet, but once I'm ready I'll let you know more information about it. ;)#14. Start my YouTube channel.
I've tried a few times before to start making videos, but I had some technical difficulties and that made me have second thoughts about it. But I really want to start my YouTube channle, because I can show you so many more things and be more detailed with the way I do things. So, my goal is to upload at least one video by the end of 2016.#15. Start selling in my Etsy Shop
I want to join in the fun and start creating! I have lots of ideas and I'm sure that after I take the Illustrators' course that I mentioned earlier, I'll be able to do so much more! Again the plan is to start and upload at least one listing, taking things one step at a time.#16. Create valuable content for my blog
I want to make sure that I keep on creating and writing content that helps my readers and inspires them to be more creative with their Bullet Journal. But I also want to start making more content about other categories as well, like time management, organisation and planning, goal setting and blogging.
#17. Plan My Best Year 2017
I'm so excited with the 'Your Best Year 2017' book by Lisa Jacobs, that I haven't stopped talking about it! I'm already half way through and really excited for the year ahead! I have so many ideas and Lisa managed to help me with her book and worksheets to put my thoughts in order and plan my next steps towards my goals.


How to make a better to-do list
I like to make to-do lists. They keep me focused, organised and more productive. I prefer using pen and paper for my lists. Call me old school if you like, but I find that my brain functions better this way. I remember things easier and I'm more productive. I also like my to-do lists quite detailed, to make sure I don't forget anything. I'm always on a quest to find the best ways to create the perfect to-do list that will help me achieve my goals and be very productive. Today, I'll share with you some of the ways that I found to work for me.
I like to make to-do lists. They keep me focused, organised and more productive. I prefer using pen and paper for my lists. Call me old school if you like, but I find that my brain functions better this way. I remember things easier and I'm more productive. I also like my to-do lists quite detailed, to make sure I don't forget anything. I'm always on a quest to find the best ways to create the perfect to-do list that will help me achieve my goals and be very productive. Today, I'll share with you some of the ways that I found to work for me.

1. Create a Brain Dump List.
I found that getting everything off my mind and into paper, ensures that I don't forget to do things and it also empties my brain from constantly thinking about those things. You can create one list where you write everything, or you can make more than one list for various categories i.e. for work, housework, personal, family and so on. In the case that you want to create only one list, you can colour code it to separate the tasks this way. Me personally, I have two Brain Dump Lists: one for work, and one for everything else, which I then colour code, in order to make it easier to visually see the tasks that need to be done in each category I've created.
Every month I check my Brain Dump list and I choose 1-5 tasks to tackle on that month. I break each one into smaller more manageable steps and then, I allocate a few steps of each task for each week of the month. So, when I'm writing my daily to-do list, I check my weekly spread and choose what steps/tasks need to be done on that day.
2. Break the big tasks down into smaller more manageable tasks/steps.
You can do that directly on your Brain Dump list, or you can create a separate smaller list for the specific project or task with all the steps that you need to take.

3. Mark the Important tasks.
I break the tasks down into
Urgent if they are important or need to be done as soon as possible, or
Not Urgent if they can be tackled at a later date. What I do, is to place a little red dot next to the important tasks, so that I know straight away which ones I should do first.
4. Start with the most important tasks.
Each day I start by noting down the 3 most important tasks on my list. Again, I do that by placing a little red dot next those tasks. These are the tasks that have to be done no matter what. So, if I only do those 3 and nothing else, I can still consider my day quite productive.
Tackle your most important tasks first and don't waste time on trivial tasks.

5. Time everything.
I write an estimated time next to each task. I use this in conjuction with the time management bar to see when I have enough time during my day to allocate for each particular task.
6. Time yourself.
I find that whenever I use a timer when doing a task, I do it quicker and more efficiently. By timing myself for each task, I can also see if my time estimates that I mentioned above are reasonable. And funnily enough, while doing this exercise I found that I have a completely wrong sense of time and my time estimates were completely off! I also like to use the pomodoro technique.
7. Pick a time every day to write your to-do list for the next day.
I prefer to do this before I go to bed. I tend to spend anything between 10-20 minutes to plan my to-do list for the next day. I go through my future log, my brain dump list and my weekly spread to see what tasks I have to do for the next day.
The above steps / techniques have helped me immensely to plan ahead and to be more productive. Please share in the comments below any tips or tricks you use in order to create your perfect to-do list.


Creative Journaling Course
Step by step video lessons that will help you set up and organise your life in your journal.
Review: William Hannah Notebook
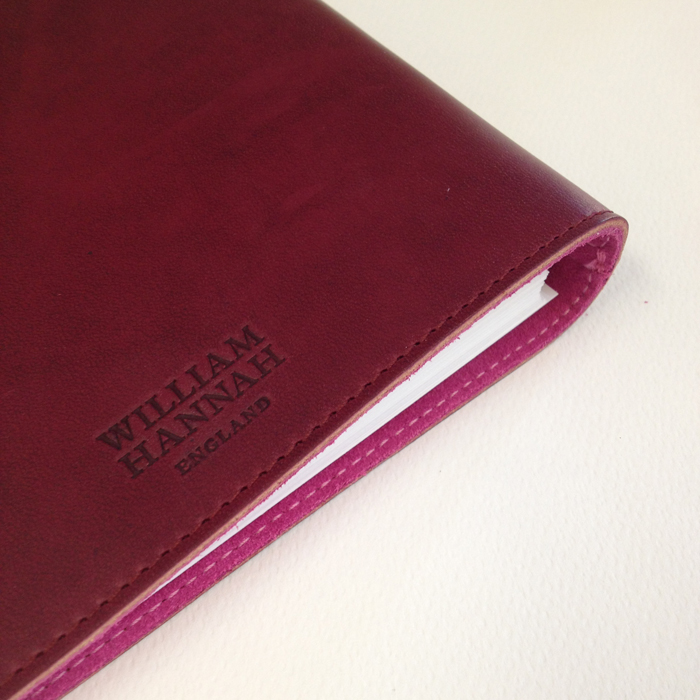
In September I was lucky enough to be sent the William Hannah Notebook for review, and I have to tell you... it was love at first sight - literally! I love my bullet journal and I'm a big fan of the Leuchtturm1917 notebooks. However, since seeing Nicole's and Cristina's disc binding journals, I really wanted to give that type of notebook a try. So, when David from William Hannah approached me, I was over the moon!
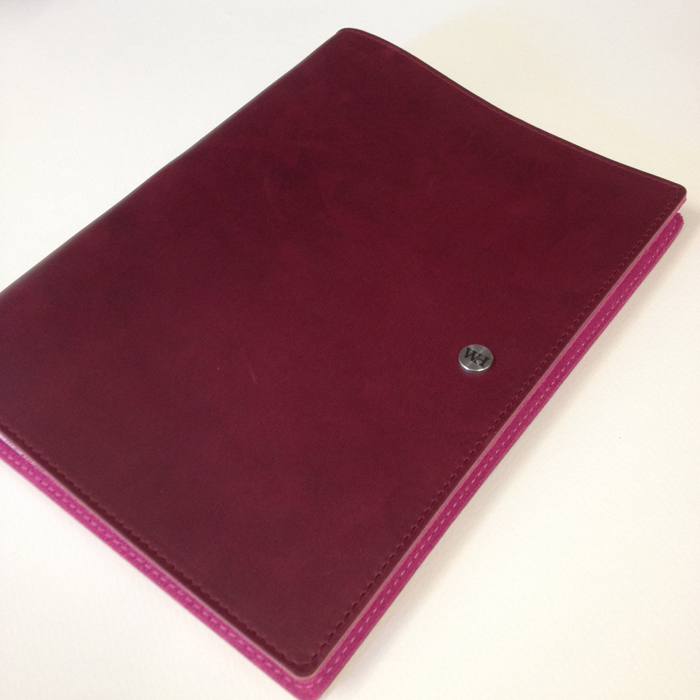
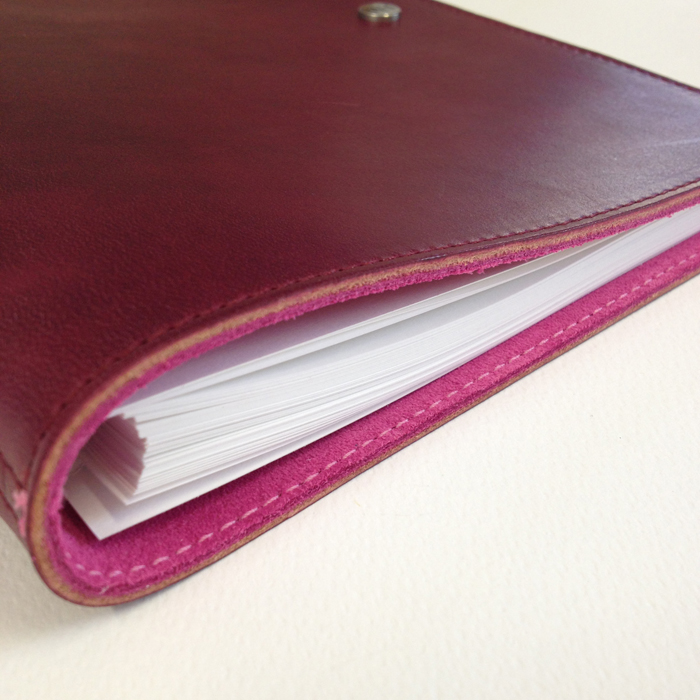
I was able to choose any combination I wanted, so even though my favourite colour is blue, I went for the Bordeaux & Fuchsia Notebook. The William Hannah is an A5 size notebook that comes in 15 amazing colour combinations. I have to say that all the notebooks look amazing and I had a difficult time deciding on which combination to go for. I must have spend at least an hour on their website deciding on the colours.
When the postman delivered the box, it felt like Christmas came early! The packaging was fantastic. It comes all wrapped up in a black box with the WH initials.
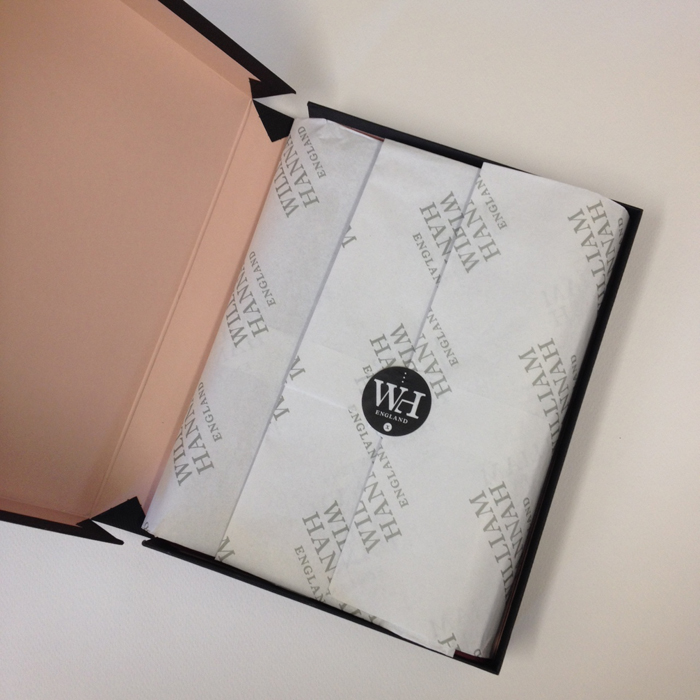
The notebook itself is absolutely amazing and of high quality. The cover is made of leather that is so incredibly soft (and smells so good!), and the inside lining is made of high quality Italian suede.
I love the metal accents that give character to the notebook.
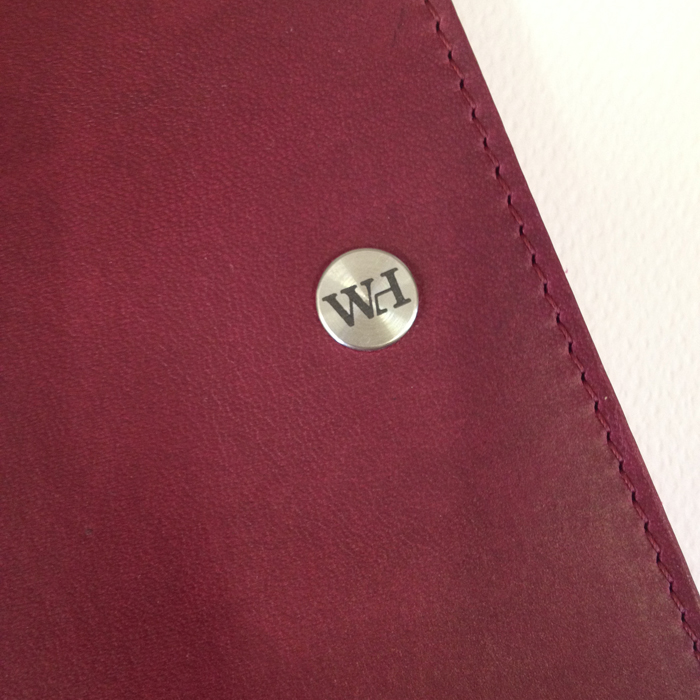
The attention to detail is exquisite!
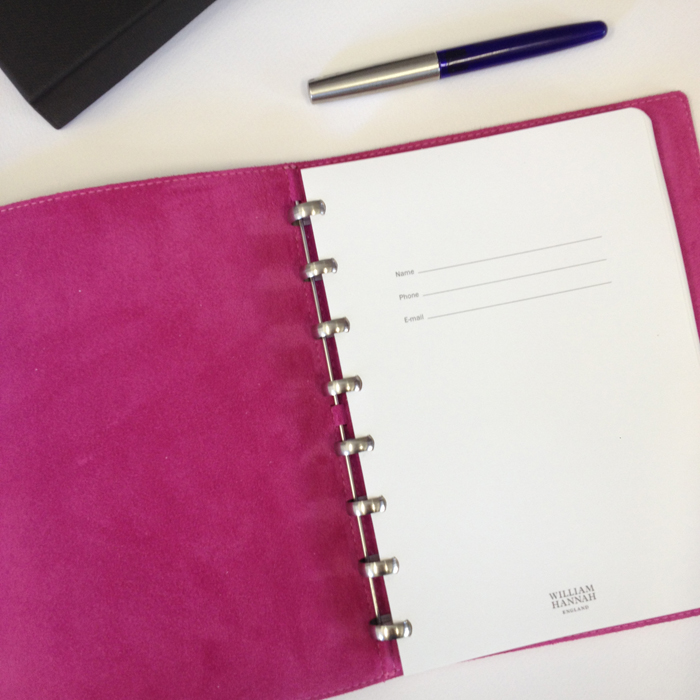
The disc binding mechanism is made out of 303 gauge stainless steel that promises never to tarnish. I really like the stainless steel bar that they use to keep the discs in place inside the cover. That gives the notebook stability and security. That was one of my basic worries with the disc binding notebooks, but it seems that the WH Notebook won't have any problems like that.
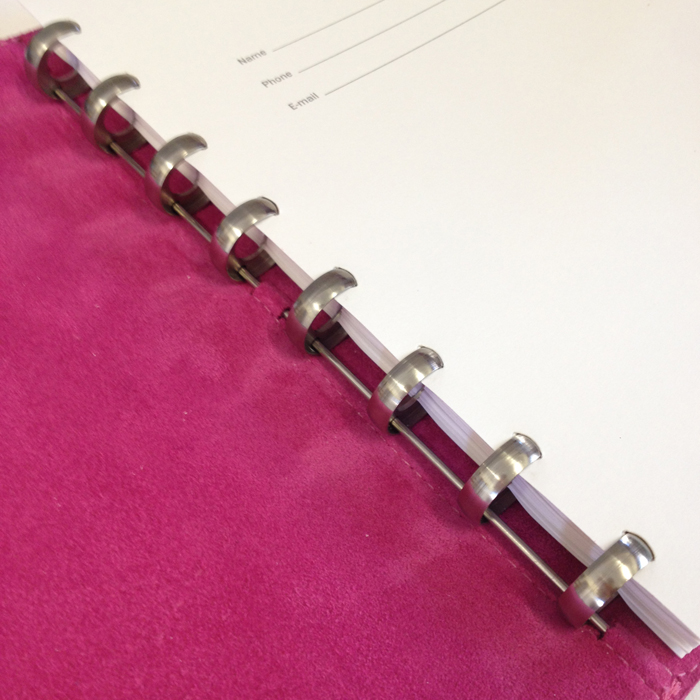
You can easily remove the paper by pulling down from the top.
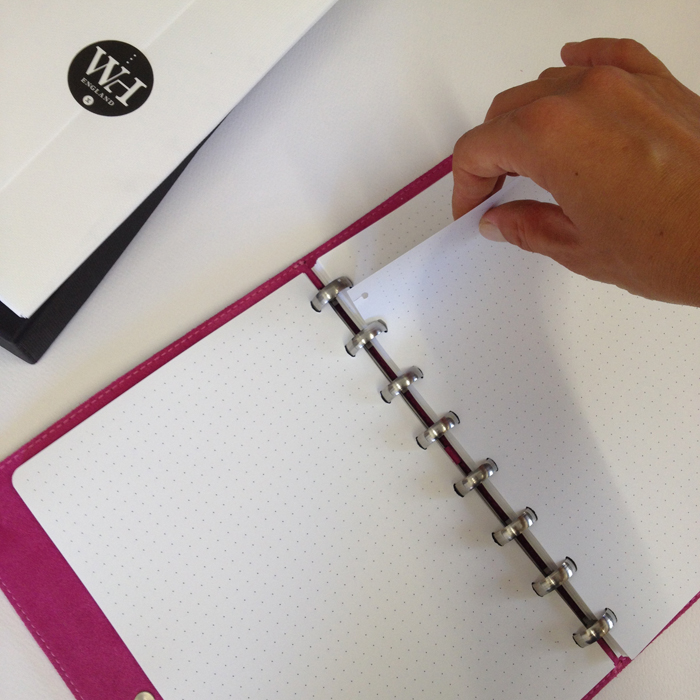
After choosing the colour of the leather and the suede lining, then you can choose the layout, quantity and line colour of your pages. The quality of the paper is amazing - extra thick 115gsm acid free luxury paper - which is so smooth that your pens literally glide on it.
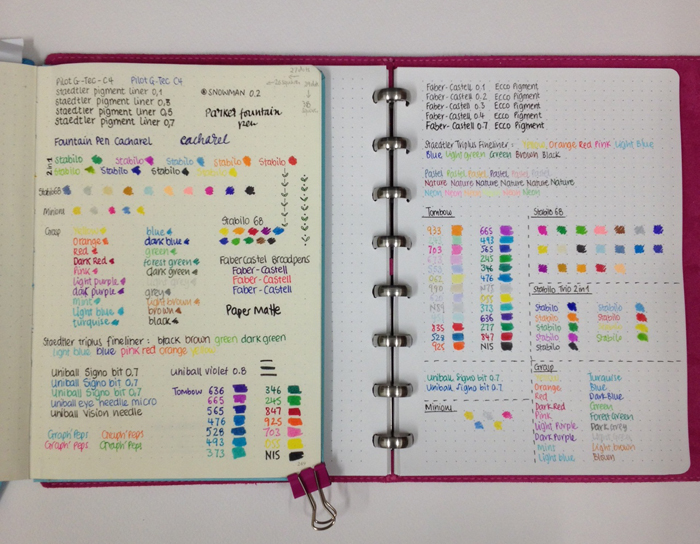
In the above page is my Pen Test Pages for Leuchtturm1917 and the William Hannah notebooks respectively. The pens write so beautifully on the WH notebook - it's a dream!
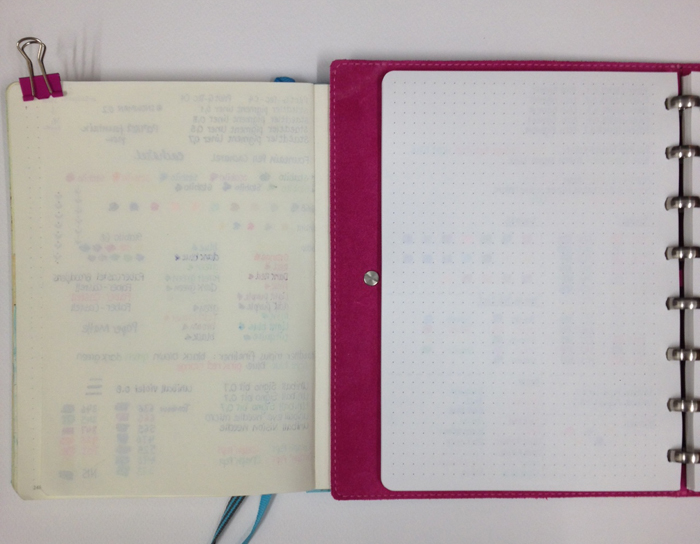
And there is literally no ghosting in the WH one! ( In the above page it's the Leuchtturm1917 on the left and the William Hannah on the right).
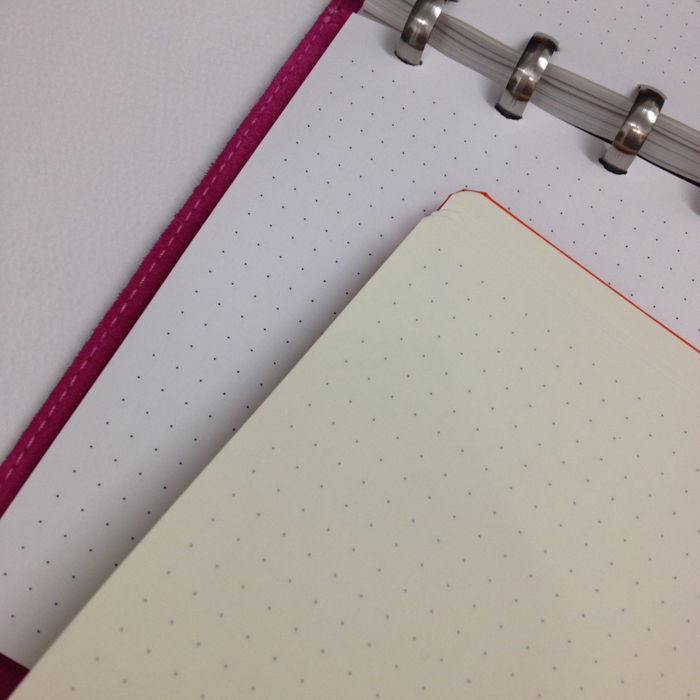
The colour of the pages is slightly whiter than that of Leuchtturm1917 - something that I personally prefer. And the space between the dots is 5mm, the same like Leuchtturm1917.
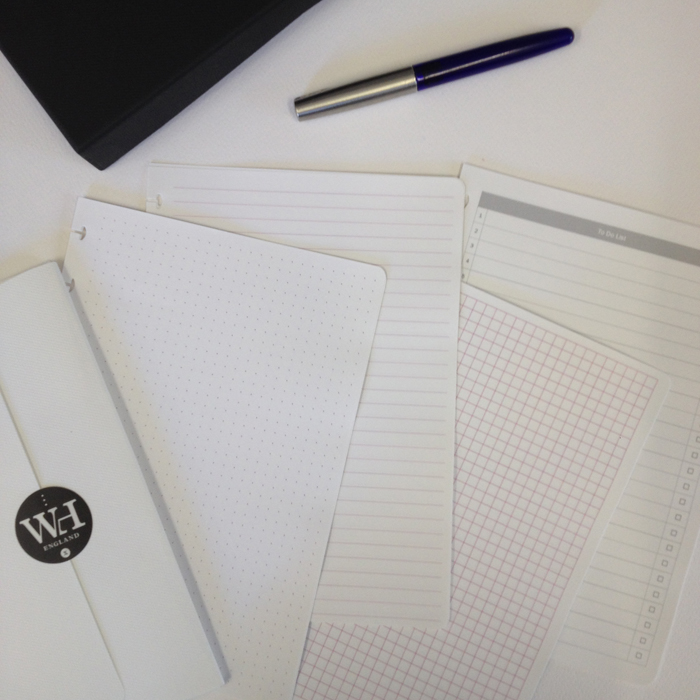
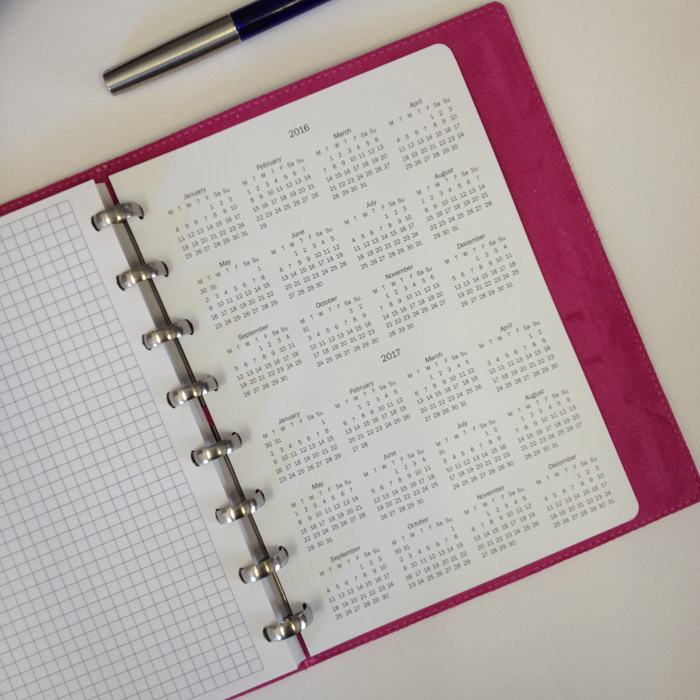
You can choose from plain, dotted, lined and grid paper. They come in packets of 10 sheets, so that you can get a variety (like I did) to try them out. You can configure it in any combination of 60 sheets (or more if you wish). You can also choose a different ink colour of your pages - if you look more closely in the above picture, I chose pink and purple for some of my pages. They also have a To-Do list and a Year at a view calendar.
As you can understand I love this notebook!
PROS
- It has great product quality.
- Excellent paper quality and thickness.
- Flexibility - you can take the pages in and out and rearrange your notebook as you want.
- Gives you the choice of separation between all the categories that you might have in your bullet journal.
- You can use it over and over again - you just need to add pages.
On the other hand though, there are some disadvantages compared to the normal notebooks.
- Price - It retails at £95 (+ shipping) which is quite expensive, but then again you get to use the notebook over and over again.
- The separation of the pages could be a bit restricting for certain types of spreads that require the pages to be connected.
- You can add a specific number of pages at a time.
For me the pros definitely outweight the cons. I trully believe this is an amazing product that you can invest on and have for life. I can't wait to start drawing and making my bullet journal spreads in it! If you like the William Hannah Notebook, make sure you put it in your Xmas Wish List ;) Don't forget to visit their website for more information.